こんにちは、Youtaです。
今回は、NumPyの論理演算関数を分かりやすく解説していきます。
この記事を読めば、bool 値(True or False)の配列に対して要素ごとの論理演算を高速に行えます。
では早速、NumPyの論理演算関数を\(4\)つご紹介しましょう!
Contents
NumPyの論理演算関数
NumPyには\(4\)つの論理演算関数があります。
それぞれ、配列同士の論理積・論理和・論理否定・排他的論理和を返します。
| 関数名 | 処理 |
|---|---|
| logical_and | 論理積 |
| logical_or | 論理和 |
| logical_not | 論理否定 |
| logical_xor | 排他的論理和 |
次章では、各関数を\(1\)つずつ見ていきます。
logical_and
logical_andは、\(2\)つの配列の各要素の論理積(AND演算)を計算します。
論理積、つまり両方がTrueの場合のみTrueを返します。
import numpy as np

a = np.array([True, True, False, False])
b = np.array([True, False, True, False])

result = np.logical_and(a, b)

print(result)
# [True False False False]int型やfloat配列では、非ゼロはTrue、ゼロはFalseとして扱われます。
import numpy as np

a = np.array([1, 0, 3, -4])
b = np.array([5, 0, 0, 2])

print(np.logical_and(a, b))
# [True False False True]

x = np.array([1.0, 0.0, 3.0, -4.0])
y = np.array([5.0, 0.0, 0.0, 2.0])

print(np.logical_and(x, y))
# [True False False True]
logical_or
np.logical_orは、\(2\)つの配列の各要素の論理和(OR演算)を計算します。
論理和、つまり少なくとも一方がTrueであればTrueを返します。
import numpy as np

a = np.array([True, True, False, False])
b = np.array([True, False, True, False])

result = np.logical_or(a, b)

print(result)
# [True True True False]int型やfloat配列では、非ゼロはTrue、ゼロはFalseとして扱われます。
import numpy as np

a = np.array([1, 0, 3, -4])
b = np.array([5, 0, 0, 2])

print(np.logical_or(a, b))
# [True False True True]

x = np.array([1.0, 0.0, 3.0, -4.0])
y = np.array([5.0, 0.0, 0.0, 2.0])

print(np.logical_or(x, y))
# [True False True True]
logical_not
np.logical_notは、配列の各要素の論理否定(NOT演算)を計算します。
論理否定、つまりTrueをFalseに、FalseをTrueに逆転させます。
import numpy as np

a = np.array([True, False, True, False])

result = np.logical_not(a)

print(result)
# [False True False True]int型やfloat配列では、非ゼロはTrue、ゼロはFalseとして扱われます。
ゼロだけTrueにしたい場合に便利ですよ。
import numpy as np

a = np.array([1.0, 0.0, 3.0, -4.0])

print(np.logical_not(a))
# [False True False False]

x = np.array([1, 0, 3, -4])

print(np.logical_not(x))
# [False True False False]
logical_xor
np.logical_xorは、\(2\)つの配列の各要素の排他的論理和(XOR演算)を計算します。
排他的論理和、つまり2つの値が異なる場合(一方がTrueで他方がFalse)のみTrueを返します。
import numpy as np

a = np.array([True, True, False, False])
b = np.array([True, False, True, False])

result = np.logical_xor(a, b)

print(result)
# [False True True False]int型やfloat配列では、非ゼロはTrue、ゼロはFalseとして扱われます。
import numpy as np

a = np.array([1, 0, 3, -4])
b = np.array([5, 0, 0, 2])

print(np.logical_xor(a, b))
# [False False True False]

x = np.array([1.0, 0.0, 3.0, -4.0])
y = np.array([5.0, 0.0, 0.0, 2.0])

print(np.logical_xor(x, y))
# [False False True False]&(AND) |(OR) ~(NOT) ^(XOR)との違い
Numpyでは &(AND)・|(OR)・~(NOT)・^(XOR)等のビット演算子もブール演算に利用できます。
下表をご覧ください。
| ビット演算子 | 処理 | 等価な論理演算関数 |
|---|---|---|
& | 論理積 | logical_and |
| | 論理和 | logical_or |
~ | 論理否定 | logical_not |
^ | 排他的論理和 | logical_xor |
bool型配列の場合、& や | 等のビット演算子は logical_* 系関数と同じ働きです。
import numpy as np

a = np.array([True, True, False, False])
b = np.array([True, False, True, False])

print(a & b)  # logical_and(a, b)と同じ
# [True False False False]

print(a | b)  # logical_or(a, b)と同じ
# [True True True False]

print(~a)    # logical_not(a)と同じ
# [False False True True]

print(a ^ b)  # logical_xor(a, b)と同じ
# [False True True False]
logical_andと&って同じっしょ?
じゃあ&で良いじゃん。

bool型配列の場合のみです。
それ以外の型では、意図しない結果が出る可能性があります。
bool型配列以外ではビット演算子の挙動はどうなるのでしょうか。
次章からは、int型・float型配列に対するビット演算子の動作を見ていきましょう。
int型配列に対する動作の違い
まずは、int型配列にビット演算子を適用するケースを考えます。
結論、要素が\(2\)進数に変換されてビット演算されます。
前提として、logical_andをint型配列へ適用した場合の挙動をおさらいしましょう。
非ゼロはTrue、ゼロはFalseとして扱われるのでしたね。
import numpy as np

a = np.array([1, 2, 3, 4])
b = np.array([0, 1, 0, 1])

print(np.logical_and(a, b))
# [False True False True]では、logical_andと&を入れ替えてみましょうか。
出力結果です。
print(a & b)
# [0 0 0 0]
え?なんで?

&は本来ビット演算子です。
各要素の\(2\)進数表記に対してAND演算を行っています。

わけわからん。
わかりやすく解説します。
一旦、配列aとbの各要素を\(2\)進数に直しましょう。
a = np.array([1, 2, 3, 4])
# 1 -> 0001
# 2 -> 0010
# 3 -> 0011
# 4 -> 0100

b = np.array([0, 1, 0, 1])
# 0 -> 0000
# 1 -> 0001
# 0 -> 0000
# 1 -> 0001配列aとbの添え字が同じ要素同士で、各ビットのAND演算を行います。
a = np.array([1, 2, 3, 4])
# 1 -> 0001
# 2 -> 0010
# 3 -> 0011
# 4 -> 0100

b = np.array([0, 1, 0, 1])
# 0 -> 0000
# 1 -> 0001
# 0 -> 0000
# 1 -> 0001

# a[0]: 0001
# b[0]: 0000
#    &: ____
#       0000

# a[1]: 0010
# b[1]: 0001
#    &: ____
#       0000

# a[2]: 0011
# b[2]: 0000
#    &: ____
#       0000

# a[3]: 0100
# b[3]: 0001
#    &: ____
# 0000見事にすべてのケースでAND演算の結果が0となりましたね。
これがa & bが[0 0 0 0]となる理由です。
このように、int型配列にビット演算子を使うと、要素が\(2\)進数に変換されてビット演算されます。
logical_* 系関数とは違う結果になる可能性があるので要注意です。
float 型配列に対する動作の違い
次に、float 型配列にビット演算子を使うとどうなるでしょうか。
結論、使えません。エラーが出ます。
logical_* 系関数は、float 型配列に対しても、非ゼロをTrue、ゼロをFalse と解釈します。
一方で、ビット演算子 & や | は float 型には適用できません。
import numpy as np

a = np.array([0.0, 1.5, -3.2, 4.0])
b = np.array([1.0, 0.0, 3.2, -4.0])

print(np.logical_and(a, b))
# [False False  True  True]

# print(a & b)
# TypeError: ufunc 'bitwise_and' not supported for the input types, and the inputs could not be safely coerced to any supported types according to the casting rule ''safe''
論理演算の明示的な型変換

とは言っても&使いたいなー。
logical_andよりシンプルじゃん。
一応、ビット演算子を使いつつ、ブール値としての動作をさせる方法もあります。
あらかじめ、配列のdtype をbool 型へ変換すると意図通りの結果が得られます。
import numpy as np

a = np.array([1, 2, 3, 4], dtype=bool)
b = np.array([0, 1, 0, 1], dtype=bool)

print(np.logical_and(a, b))
# [False True False True]

print(a & b)
# [False True False True]
ここら辺は好みの問題かも知れません。
個人的には、ビット演算子の本職はビット演算なので、論理演算はlogical_*系関数に任せたいですね。
画像処理への応用例
各論理演算関数の画像処理への応用例をご紹介します。
順に、logical_and, logical_or, logical_not, logical_xorの活用例です。
グレースケール画像の中間色のみ抽出
logical_andでグレースケール画像の中間色を抜き出す例です。
import numpy as np
import matplotlib.pyplot as plt
from PIL import Image

# 画像をグレースケールで読み込む
image = Image.open("moon.jpg").convert("L")

# NumPy 配列に変換
image_np = np.array(image)

# 中間の明るさを抽出(輝度値 50~200)
bright_mask = np.logical_and(image_np >= 50, image_np <= 200)

# マスクを適用
filtered_image = np.zeros_like(image_np)
filtered_image[bright_mask] = image_np[bright_mask]  # 中間色のみ残す

# 画像を表示
plt.subplot(1, 2, 1)
plt.imshow(image, cmap="gray")
plt.title("Original Image")
plt.axis("off")

plt.subplot(1, 2, 2)
plt.imshow(filtered_image, cmap="gray")
plt.title("Extracted Midtone Areas")
plt.axis("off")

plt.show()
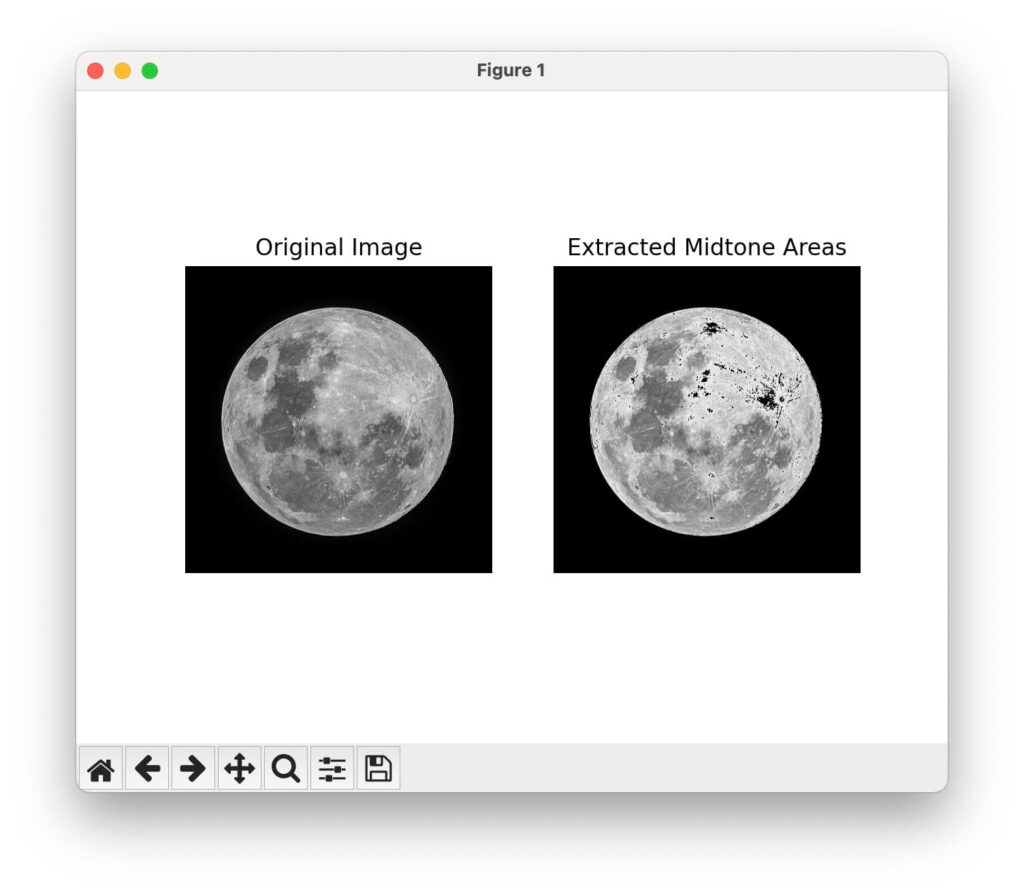
月の画像から、輝度値\(50\)~\(200\)までの箇所を抽出しました。
とはいえあまり違いが見られませんね。
これは、画像が極端に明るすぎたり暗すぎたりしていないことを意味します。
グレースケール画像の中間色のみ排除
先ほどは中間色のみを残したので、逆をやってみましょう。
logical_orでグレースケール画像の中間色だけを取り除いてみましょう。
import numpy as np
import matplotlib.pyplot as plt
from PIL import Image

# 画像をグレースケールで読み込む
image = Image.open("moon.jpg").convert("L")

# NumPy 配列に変換
image_np = np.array(image)

# 明るい部分と暗い部分を検出
dark_mask = image_np < 50  # 暗い部分
bright_mask = image_np > 200  # 明るい部分

# logical_orで両方を選択
contrast_mask = np.logical_or(dark_mask, bright_mask)

# 選択した部分だけを保持
filtered_image = np.zeros_like(image_np)
filtered_image[contrast_mask] = image_np[contrast_mask]

# 画像を表示
plt.subplot(1, 2, 1)
plt.imshow(image, cmap="gray")
plt.title("Original Image")
plt.axis("off")

plt.subplot(1, 2, 2)
plt.imshow(filtered_image, cmap="gray")
plt.title("Highlighted Bright and Dark Areas")
plt.axis("off")

plt.show()
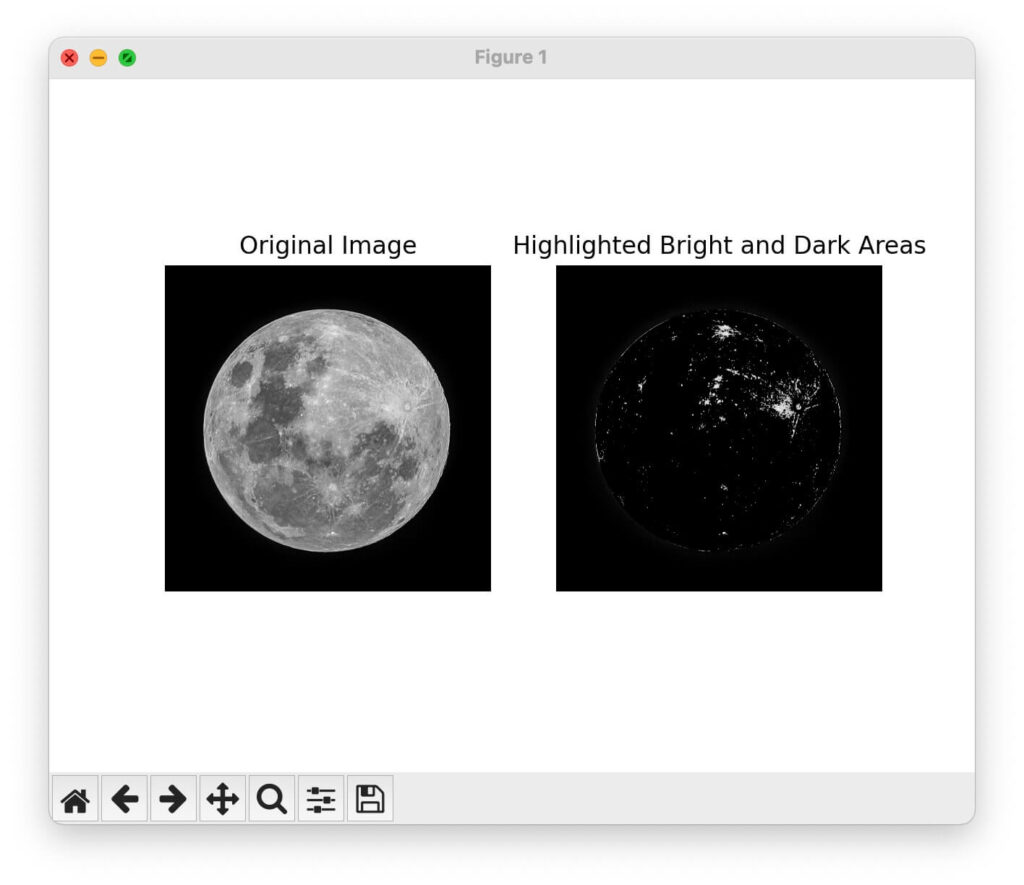
月の画像から、輝度値\(50\)未満と\(200\)超えの箇所のみ抽出しました。
ご覧のように、色がほとんど抽出されていません。
やはり、輝度値の多くが\(50\)~\(200\)付近にあることを確認できました。
モノクロ画像のネガポジ反転
logical_notでモノクロ画像の白黒を逆にしてみましょう。
モノクロ画像の代表例、QRコードで試します。
import numpy as np
import matplotlib.pyplot as plt
from PIL import Image

# 画像をモノクロで読み込む
qr = Image.open("qr_code.png").convert("1")

# NumPy 配列に変換
qr_np = np.array(qr)

# logical_notで反転
inverted_qr_np = np.logical_not(qr_np)  # 白と黒を反転

# 画像化
inverted_qr = Image.fromarray(inverted_qr_np)

# 画像を表示
plt.subplot(1, 2, 1)
plt.imshow(qr, cmap="binary")
plt.title("QR Code")
plt.axis("off")

plt.subplot(1, 2, 2)
plt.imshow(inverted_qr, cmap="binary")
plt.title("Inverted QR Code")
plt.axis("off")

plt.show()
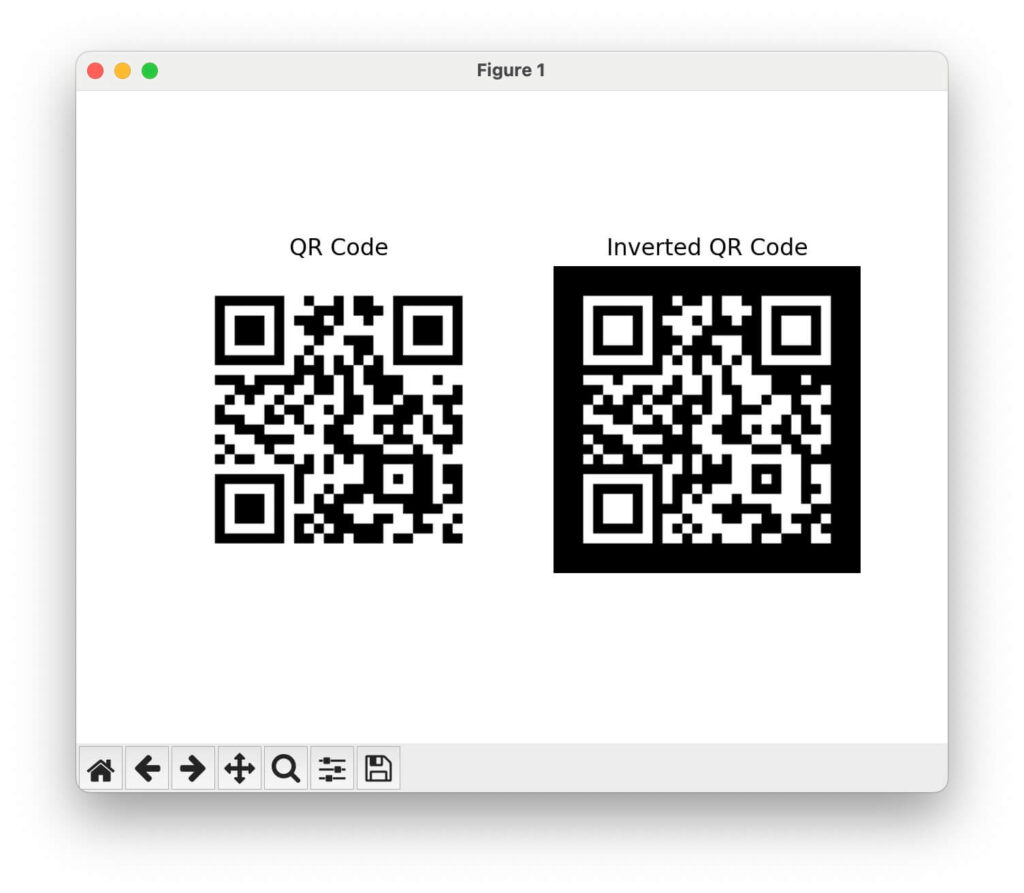
面白いことに、QRコードの白黒を反転させても読み込めるんですよね。
ちなみにリンク先は私のブログです。
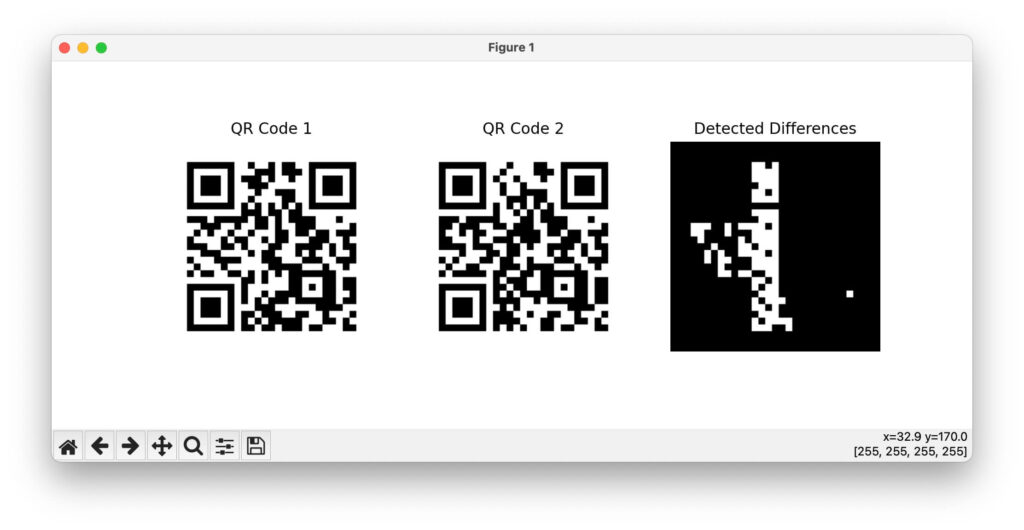
モノクロ画像同士の差分検出
logical_xorで\(2\)枚のモノクロ画像の差分を出してみましょう。
似たような画像がいいので、QRコード同士の比較をお見せします。
from PIL import Image
import numpy as np
import matplotlib.pyplot as plt

# QRコード画像を開く(1ビットのモノクロ)
qr_1 = Image.open("qr_code_1.png").convert("1")
qr_2 = Image.open("qr_code_2.png").convert("1")

# NumPy 配列に変換
binary_1 = np.array(qr_1)
binary_2 = np.array(qr_2)

# logical_xorで差分を検出
diff_mask = np.logical_xor(binary_1, binary_2)

# 差分部分を可視化
highlighted_diff = Image.fromarray(diff_mask)

# 結果を表示
plt.figure(figsize=(10, 4))

plt.subplot(1, 3, 1)
plt.imshow(qr_1, cmap="binary")
plt.title("QR Code 1")
plt.axis("off")

plt.subplot(1, 3, 2)
plt.imshow(qr_2, cmap="binary")
plt.title("QR Code 2")
plt.axis("off")

plt.subplot(1, 3, 3)
plt.imshow(highlighted_diff, cmap="binary")
plt.title("Detected Differences")
plt.axis("off")

plt.show()
差分のある箇所のみ抽出しました。
どちらのQRコードを読んでも私のサイトに飛びます。
まとめ
NumPyの論理演算関数は、データ分析や画像処理で活躍するツールです。
複雑な条件に基づくデータのフィルタリングが簡単に行えます。
では、本日学んだ\(4\)つの関数を復習しましょう。
| 関数名 | 処理 |
|---|---|
| logical_and | 論理積 |
| logical_or | 論理和 |
| logical_not | 論理否定 |
| logical_xor | 排他的論理和 |
次に、各関数の画像処理における使い所を示しました。
グレースケール・モノクロ画像のみで少々地味でしたが、カラー画像にも応用可能です。
興味のある方は是非挑戦してみてください。
この記事が皆様のお役に立てれば幸いです。
ご覧いただきありがとうございました。
