
この記事の内容
- 【結論】Tkinterで角丸長方形は作れる
- Tkinterでの角丸長方形の作り方
- Tkinterで長方形の一部分だけ角丸に
こんにちは、Youta(@youta_blog)です。
今回は、TkinterのCanvas上に角丸長方形を描きます。
 すずか
すずか
 先生
先生
この記事を読めば、Tkinterで角丸長方形を作れます。
もちろん、角の丸め具合は自由自在です。
本記事では、解説・確認用コード・実行結果の3点をご用意しております。
また必要に応じてコードの解説をしていますので、初心者でも安心です。
記事の信頼性は、確認用コードと実行結果が保証します。
少しでも疑問に感じたら、是非ともコードをコピペしてPCで確かめてみてください。
それでは、Tkinterで角を丸くした長方形を描く手法を見ていきましょう。
Contents
角丸長方形を作るプログラム
この章では、本記事で作るプログラム・結果を先にお見せします。
詳細は後で解説するのでご安心ください。
実装例
結論、次の9つの関数(自作)を使います。
flattenget_arc_coordsget_upper_left_rounded_corner_coordsget_upper_right_rounded_corner_coordsget_lower_right_rounded_corner_coordsget_lower_left_rounded_corner_coordsget_adjustment_rangeget_max_adjustment_rangeget_rounded_rectangle_coords
import numpy as np


def flatten(sequence):
    result = []

    for item in sequence:
        if isinstance(item, (list, tuple, range, dict, set, frozenset)):
            result.extend(flatten(item))
        else:
            result.append(item)

    return result


def get_arc_coords(center, size, angle_range, is_radian=False, num_coords=None):
    center_x, center_y = center
    radius_x, radius_y = np.array(size) / 2
    start_angle, end_angle = angle_range

    if not is_radian:
        start_angle = np.radians(start_angle)
        end_angle = np.radians(end_angle)

    if num_coords is None:
        angle_diff_radians = end_angle - start_angle
        angle_diff_degrees = np.degrees(angle_diff_radians)
        signed_num_coords = int(angle_diff_degrees)
        num_coords = abs(signed_num_coords)

    angle = np.linspace(start_angle, end_angle, num_coords)

    xs = radius_x * np.cos(angle) + center_x
    ys = radius_y * np.sin(angle) + center_y

    points = []
    for x, y in zip(xs, ys):
        points.extend((x, y))

    return points


def get_upper_left_rounded_corner_coords(bbox_coords, radius):
    center = (bbox_coords[0] + radius, bbox_coords[1] + radius)

    diameter = radius * 2
    size = (diameter, diameter)

    angle_range = (-180, -90)

    return get_arc_coords(center, size, angle_range)


def get_upper_right_rounded_corner_coords(bbox_coords, radius):
    center = (bbox_coords[2] - radius, bbox_coords[1] + radius)

    diameter = radius * 2
    size = (diameter, diameter)

    angle_range = (-90, 0)

    return get_arc_coords(center, size, angle_range)


def get_lower_right_rounded_corner_coords(bbox_coords, radius):
    center = (bbox_coords[2] - radius, bbox_coords[3] - radius)

    diameter = radius * 2
    size = (diameter, diameter)

    angle_range = (0, 90)

    return get_arc_coords(center, size, angle_range)


def get_lower_left_rounded_corner_coords(bbox_coords, radius):
    center = (bbox_coords[0] + radius, bbox_coords[3] - radius)

    diameter = radius * 2
    size = (diameter, diameter)

    angle_range = (90, 180)

    return get_arc_coords(center, size, angle_range)


def get_max_adjustment_range(bbox_coords):
    width = abs(bbox_coords[0] - bbox_coords[2])
    height = abs(bbox_coords[1] - bbox_coords[3])

    return min(width, height) / 2


def get_adjustment_range(bbox_coords, ratio):
    return get_max_adjustment_range(bbox_coords) * ratio


def get_rounded_rectangle_coords(bbox_coords, ratio=1/3):
    radius = get_adjustment_range(bbox_coords, ratio)

    return flatten(
        [
            get_upper_left_rounded_corner_coords(bbox_coords, radius),
            get_upper_right_rounded_corner_coords(bbox_coords, radius),
            get_lower_right_rounded_corner_coords(bbox_coords, radius),
            get_lower_left_rounded_corner_coords(bbox_coords, radius),
        ]
    )
現段階ではわからなくても問題ないです。
実行例
先ほどのプログラムの下に次のコードを追記し、実行してみます。
if __name__ == '__main__':
    import tkinter as tk

    # 画面作成
    root = tk.Tk()

    # キャンバス作成・配置
    canvas = tk.Canvas(root, width=500, height=500)
    canvas.pack()

    # 角丸長方形作成
    shape_coords = get_rounded_rectangle_coords((50, 100, 450, 400))
    canvas.create_polygon(shape_coords)

    # 画面表示
    root.mainloop()
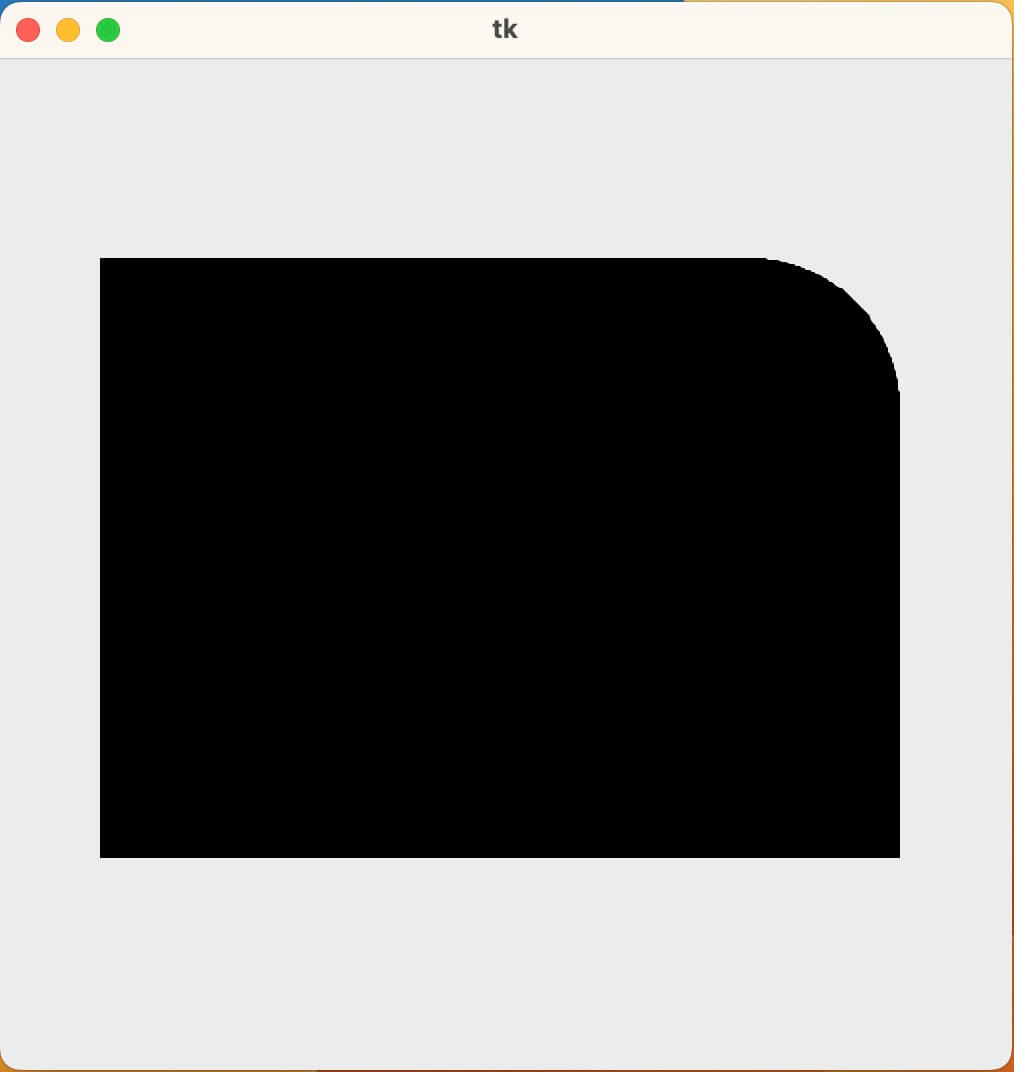
実行結果です。
すずか
先生
角丸長方形の作り方
Tkinterで角丸長方形を描くにはどうすれば良いでしょう?
結論、create_polygonメソッドを利用します。
create_polygonメソッドは、Canvasクラスに用意された、多角形を描画するメソッドです。
引数に渡した座標同士を繋ぎ、多角形を描きます。
例えば、座標を4つ渡して四角形を描きましょう。
canvas.create_polygon((x1, y1), (x2, y2), (x3, y3), (x4, y4))
必然的に、手順は次の\(2\)ステップとなります。
- 図形の頂点の座標を計算する。
- create_polygonメソッドに座標を渡す。
先ほどのコードだとこの部分。
    # 角丸長方形作成
    shape_coords = get_rounded_rectangle_coords((50, 100, 450, 400))
    canvas.create_polygon(shape_coords)
上から順に、ステップ\(1\)・\(2\)です。
create_polygonメソッドは元々Tkinterにあるので「そういうものだ」としか言えません。
ということは「そもそもメソッドに渡す座標をどう求めるか?」が問題です。
したがって、本記事ではステップ\(1\)にフォーカスして話を進めます。
では、角丸長方形の頂点の座標を求めるにはどうすれば良いでしょう。
結論、次の\(2\)つを考えます。
文言だけでは意味が分かりませんよね。
そこで、今からこの\(2\)つについて丁寧に解説していきます。
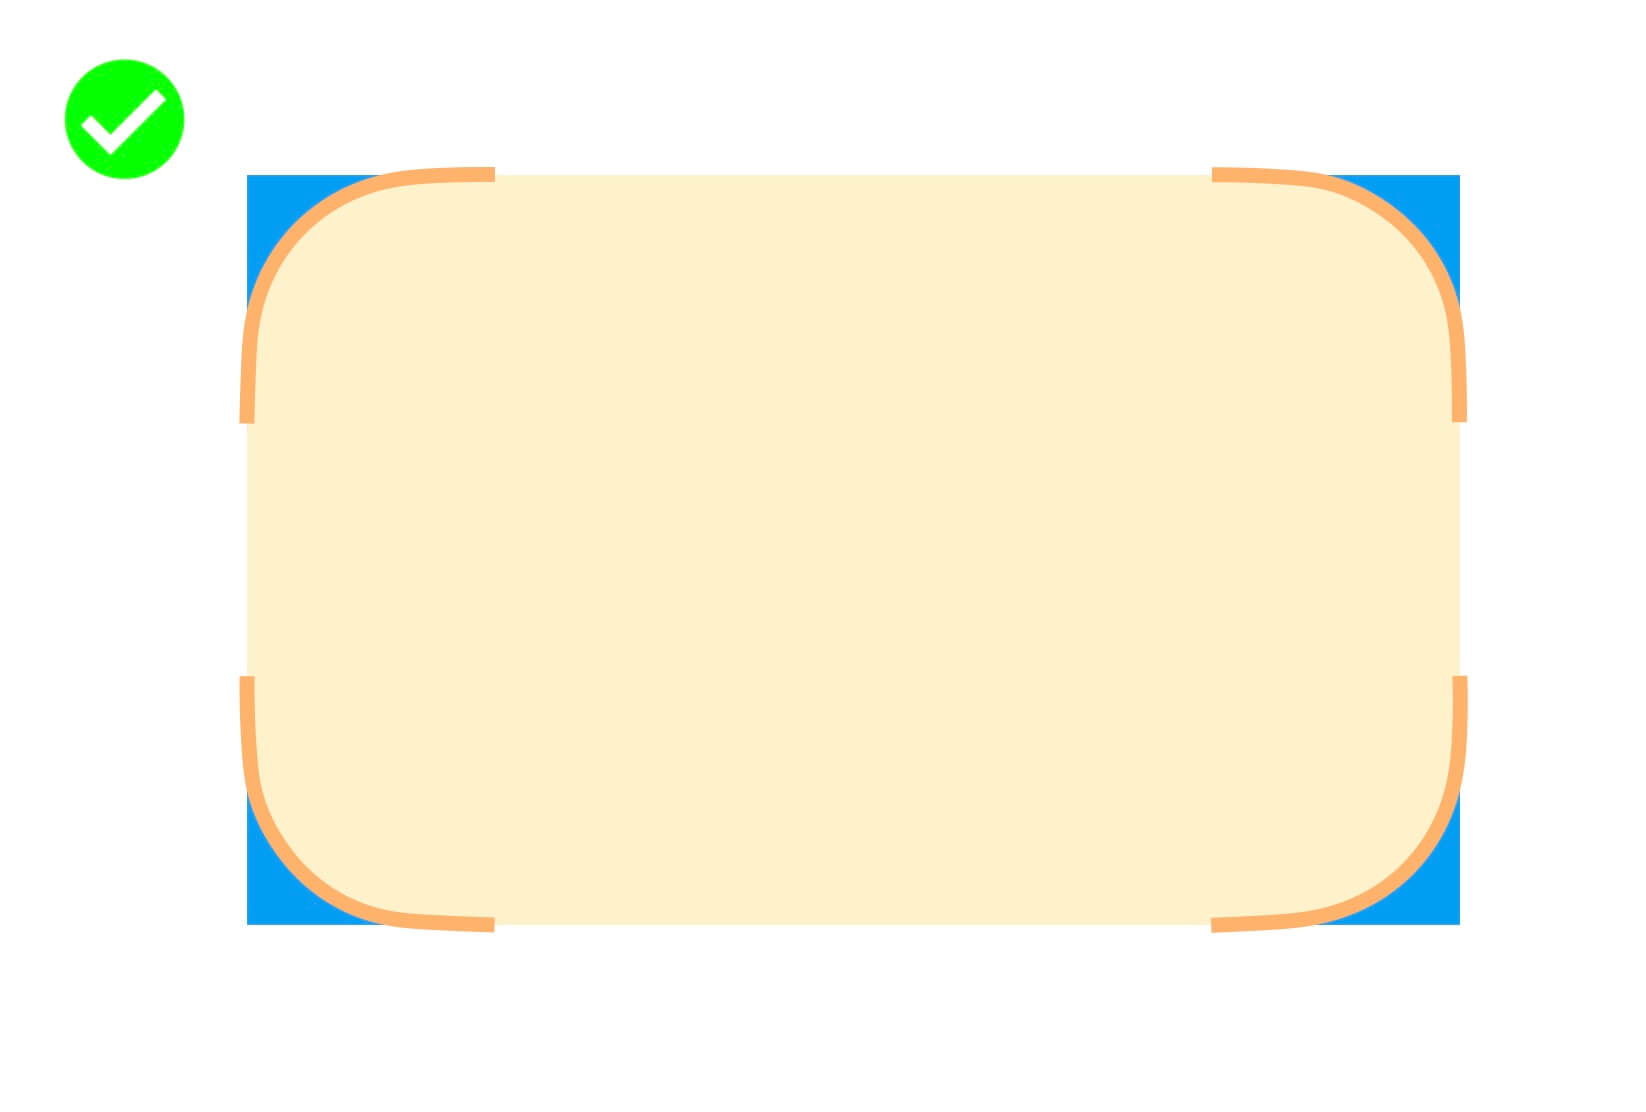
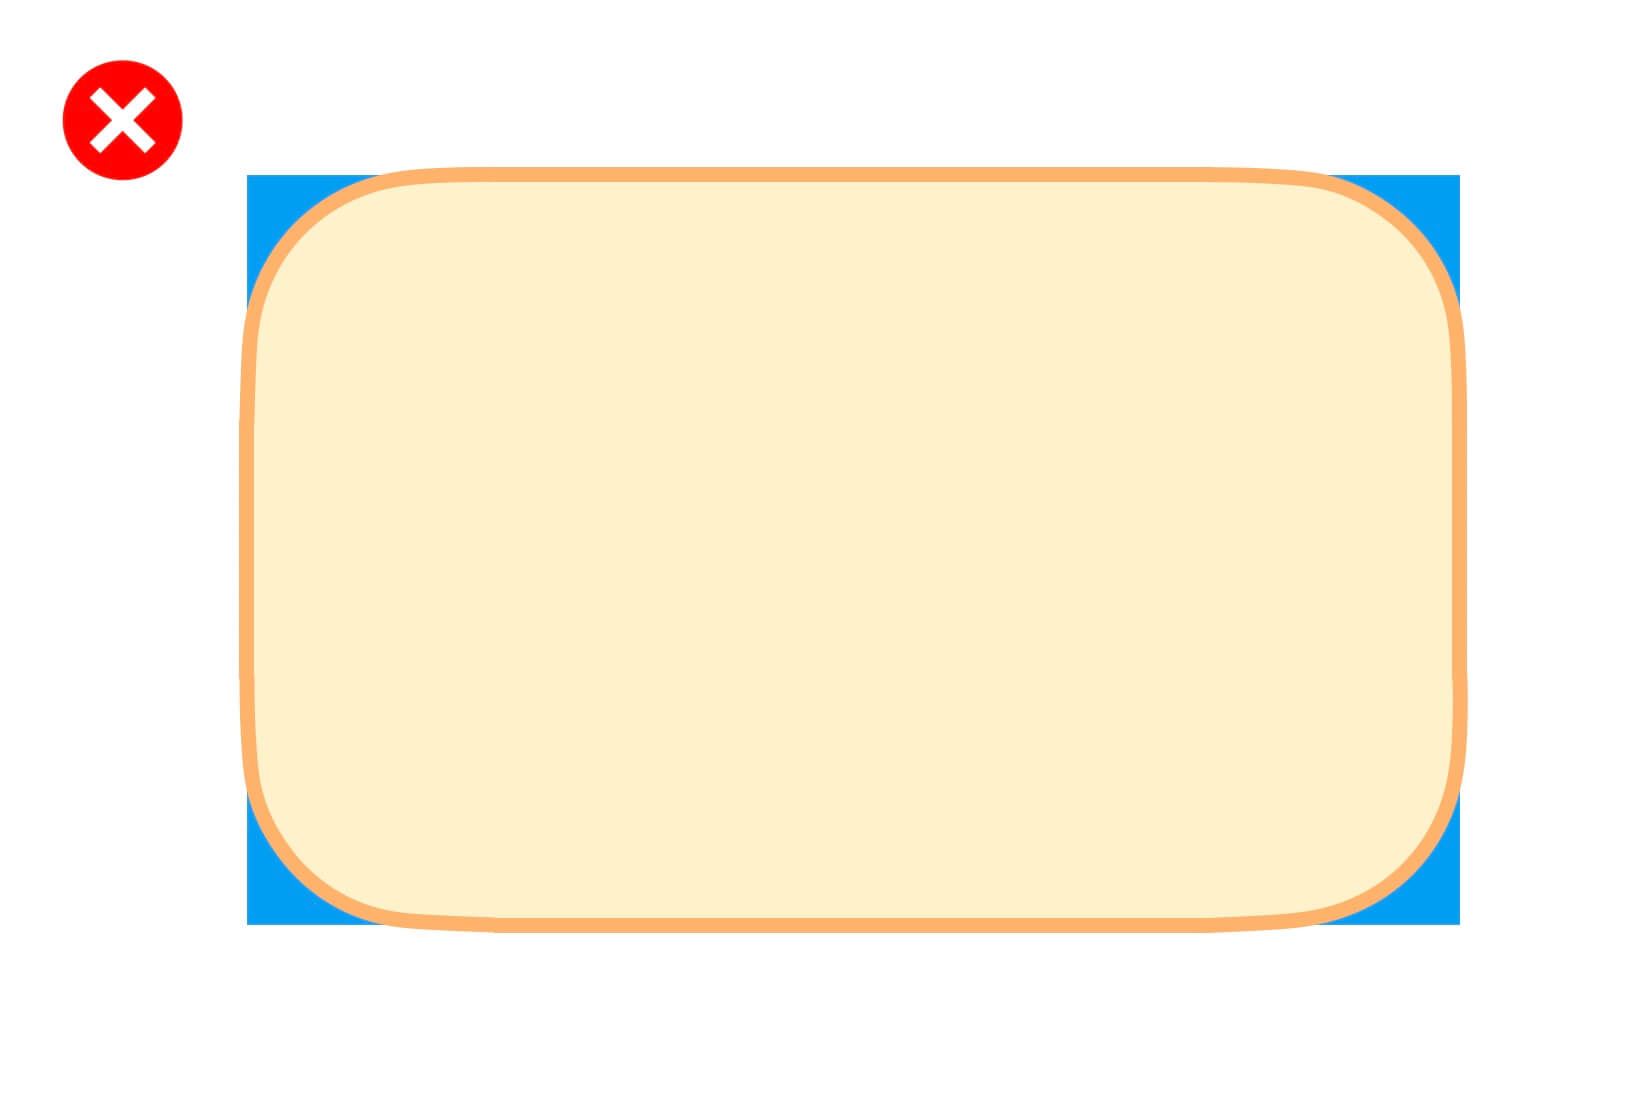
4隅のカーブの座標を求める
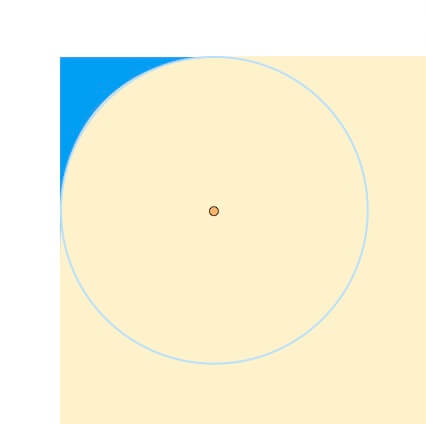
まずは、角丸長方形の丸い角の座標を求めます。
すずか
先生
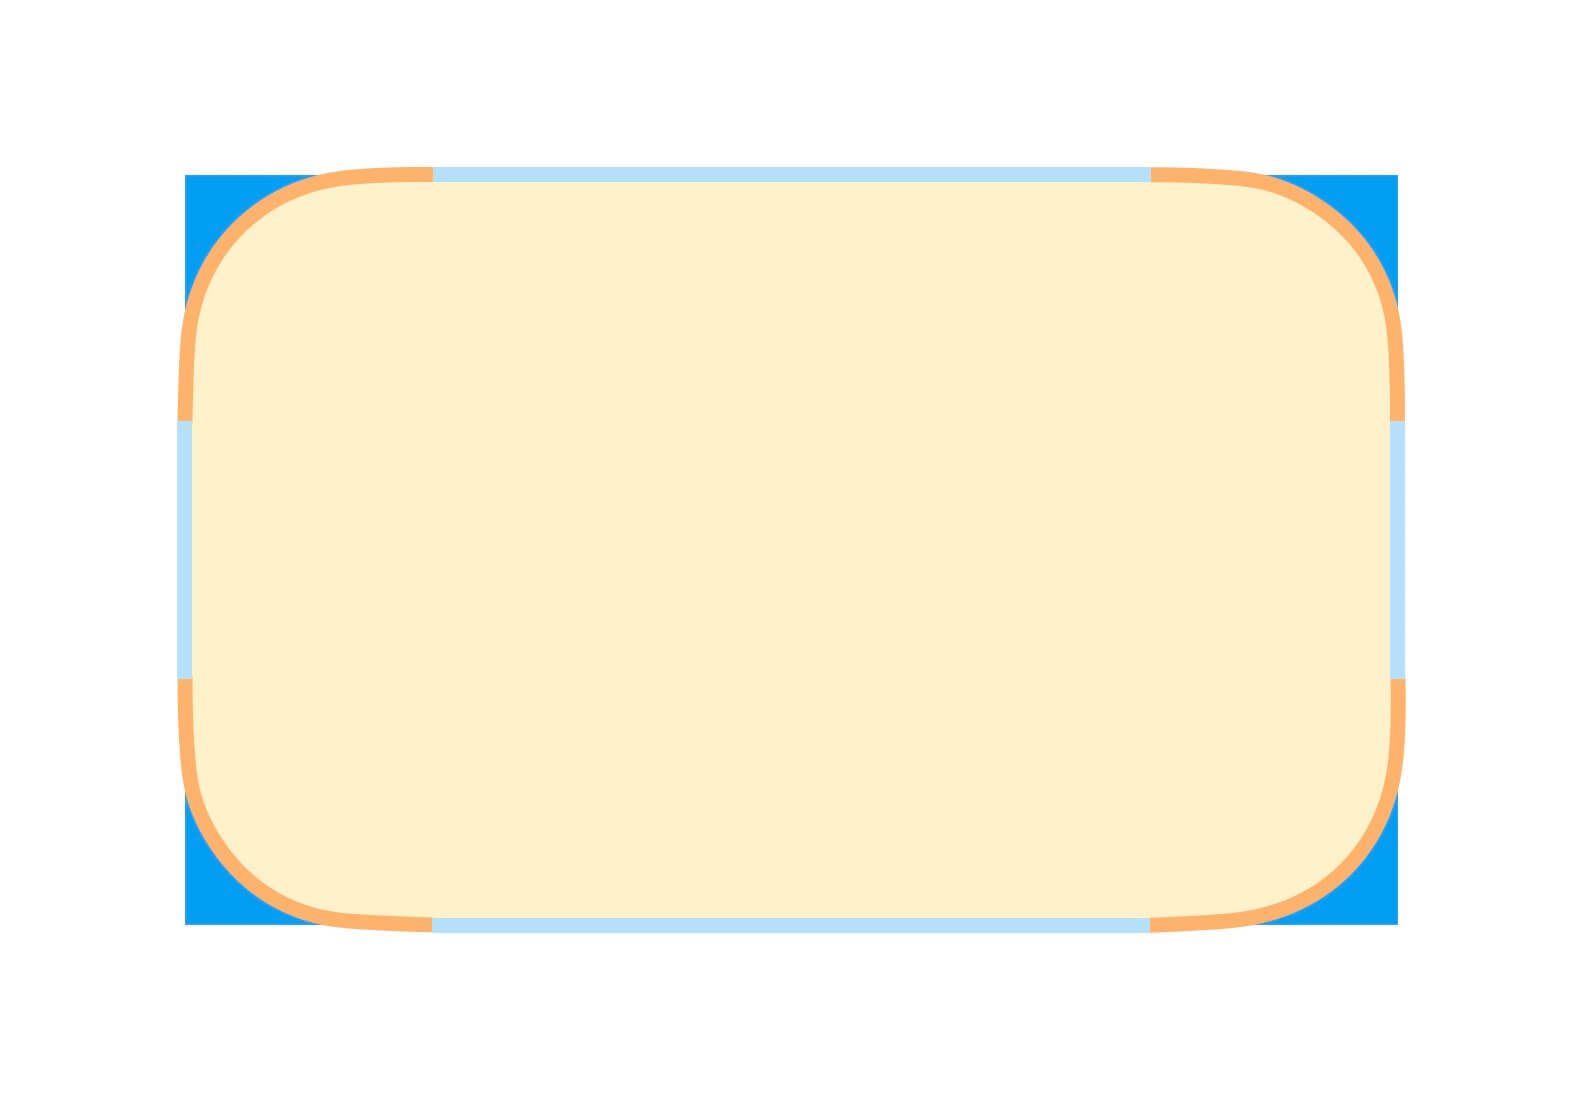
なぜなら、create_polygonメソッドは指定された座標同士を順に繋いで図形を描くからです。
したがって、図形の外周すべてではなく、角の部分の座標を計算するだけで良いのです。
水色の部分は勝手に埋められます。
すずか
先生
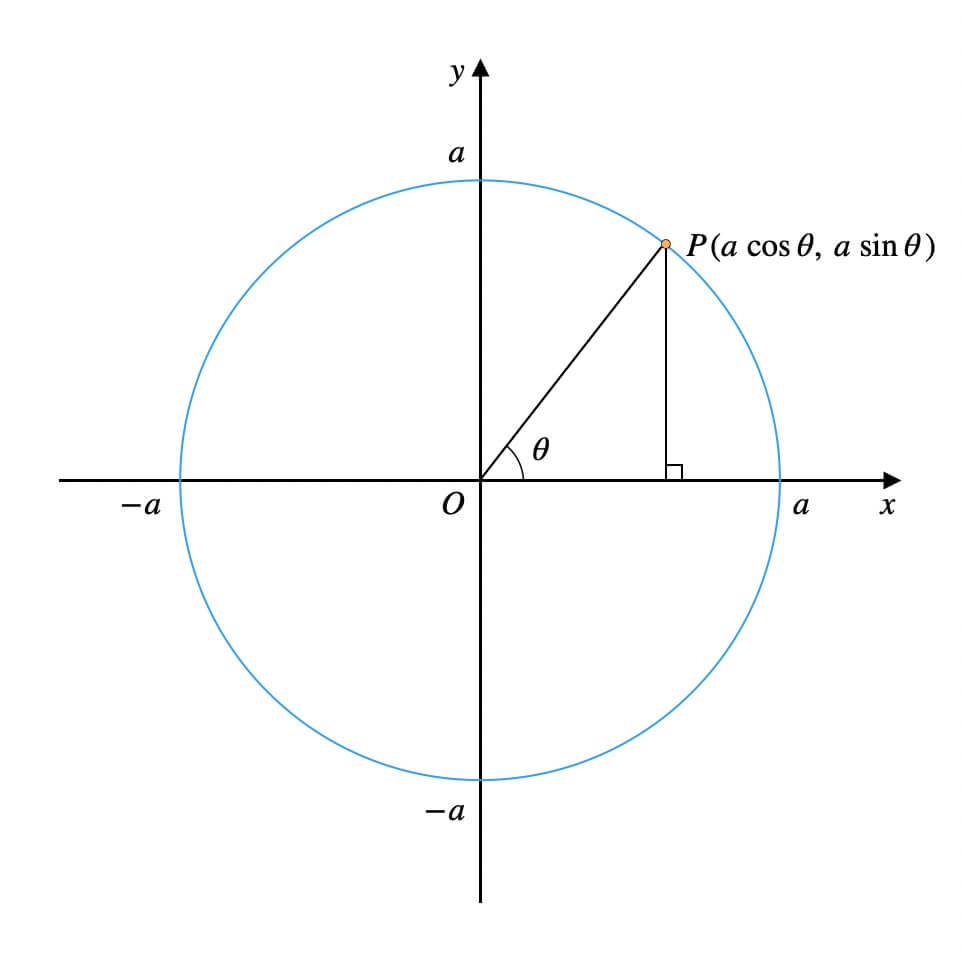
そもそも、角丸長方形の角は円の一部です。
したがって、円の媒介変数表示を使えば、簡単に座標を取得できます。
先生
すずか
ご安心ください。
別記事にて、円周上の座標を求めるプログラムを既に作ってあります。
>>【Python】円周・楕円周上の座標を求める方法を徹底解説!プログラム付き!
コードはこちらです。
import numpy as np


def get_arc_coords(center, size, angle_range, is_radian=False, num_coords=None):
    center_x, center_y = center
    radius_x, radius_y = np.array(size) / 2
    start_angle, end_angle = angle_range

    if not is_radian:
        start_angle = np.radians(start_angle)
        end_angle = np.radians(end_angle)

    if num_coords is None:
        angle_diff_radians = end_angle - start_angle
        angle_diff_degrees = np.degrees(angle_diff_radians)
        signed_num_coords = int(angle_diff_degrees)
        num_coords = abs(signed_num_coords)

    angle = np.linspace(start_angle, end_angle, num_coords)

    xs = radius_x * np.cos(angle) + center_x
    ys = radius_y * np.sin(angle) + center_y

    points = []
    for x, y in zip(xs, ys):
        points.extend((x, y))

    return points
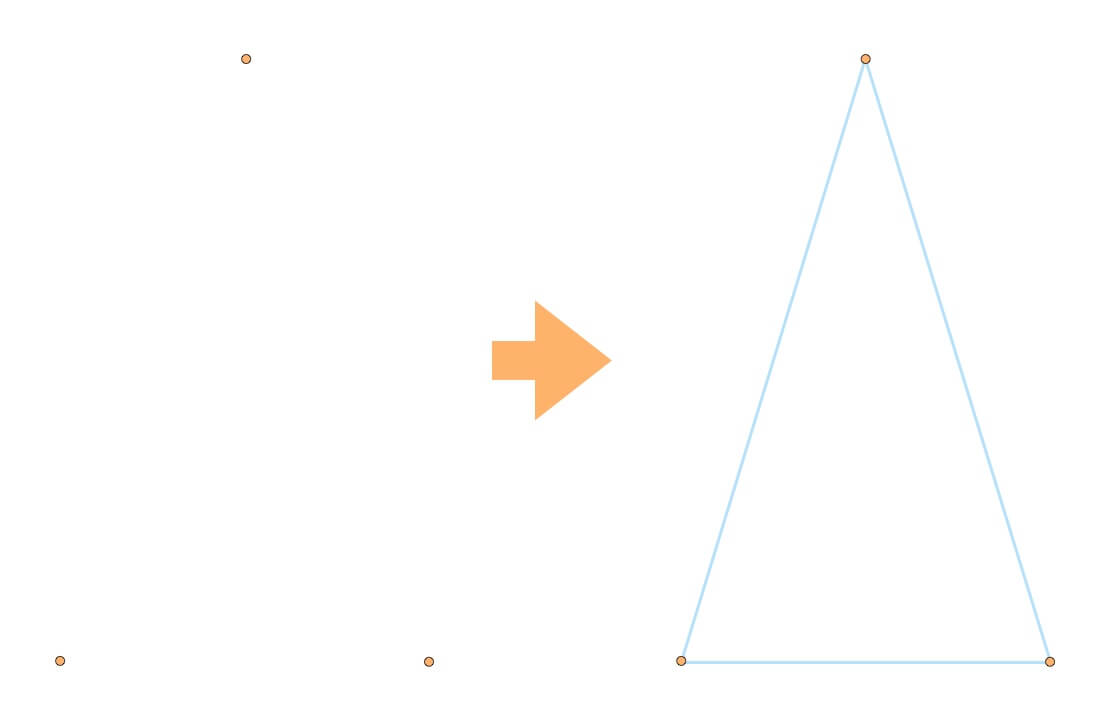
次の3つを関数に渡せば、円弧の座標など簡単に求まります。
center: 円の中心座標のタプルsize: 円のサイズ(横\(×\)縦)のタプルangle_range: 弧の範囲の角度のタプル
例えば、引数を次のように指定します。
center = (p, q)
size = (2a, 2b)
angle_range = (0, 90)

arc_coords = get_arc_coords(center, size, angle_range)
arc_coordsには矢印の部分の座標が入ります。
sizeを調整すれば円にできます。先生
get_arc_coords関数はnumpyの関数を利用しています。
numpyをインストールしていない方は、コマンドラインから下記コマンドを入力し、インストールをお願いします。
$ pip install numpy
この文言が出たら完了です。
Successfully installed numpy-〇.〇〇.〇
それでは左上→右上→右下→左下の順に座標を計算していきましょう。
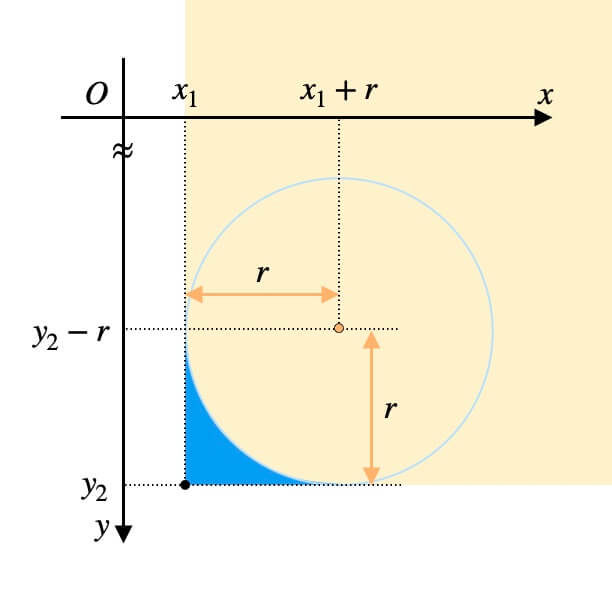
左上カーブ
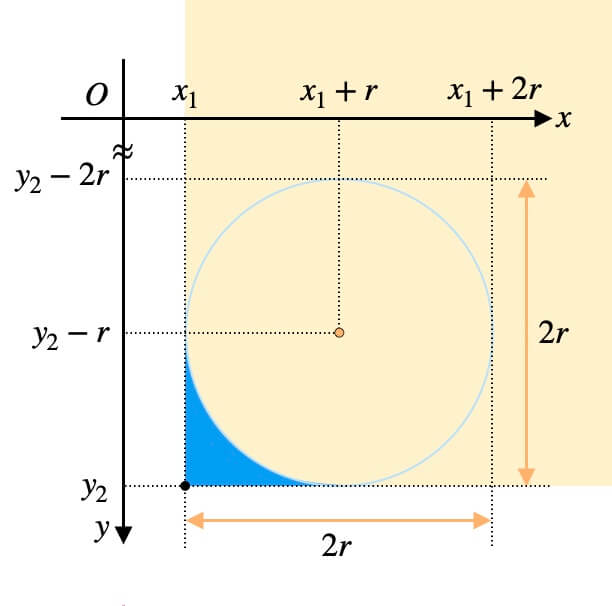
角丸長方形の左上カーブの座標を求める関数を、次のように実装しました。
def get_upper_left_rounded_corner_coords(bbox_coords, radius):
center = (bbox_coords[0] + radius, bbox_coords[1] + radius)
diameter = radius * 2
size = (diameter, diameter)
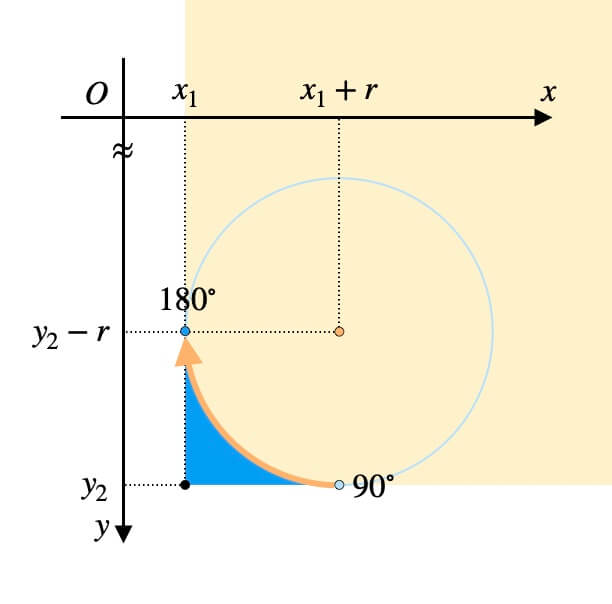
angle_range = (-180, -90)
return get_arc_coords(center, size, angle_range)
引数は\(2\)つです。
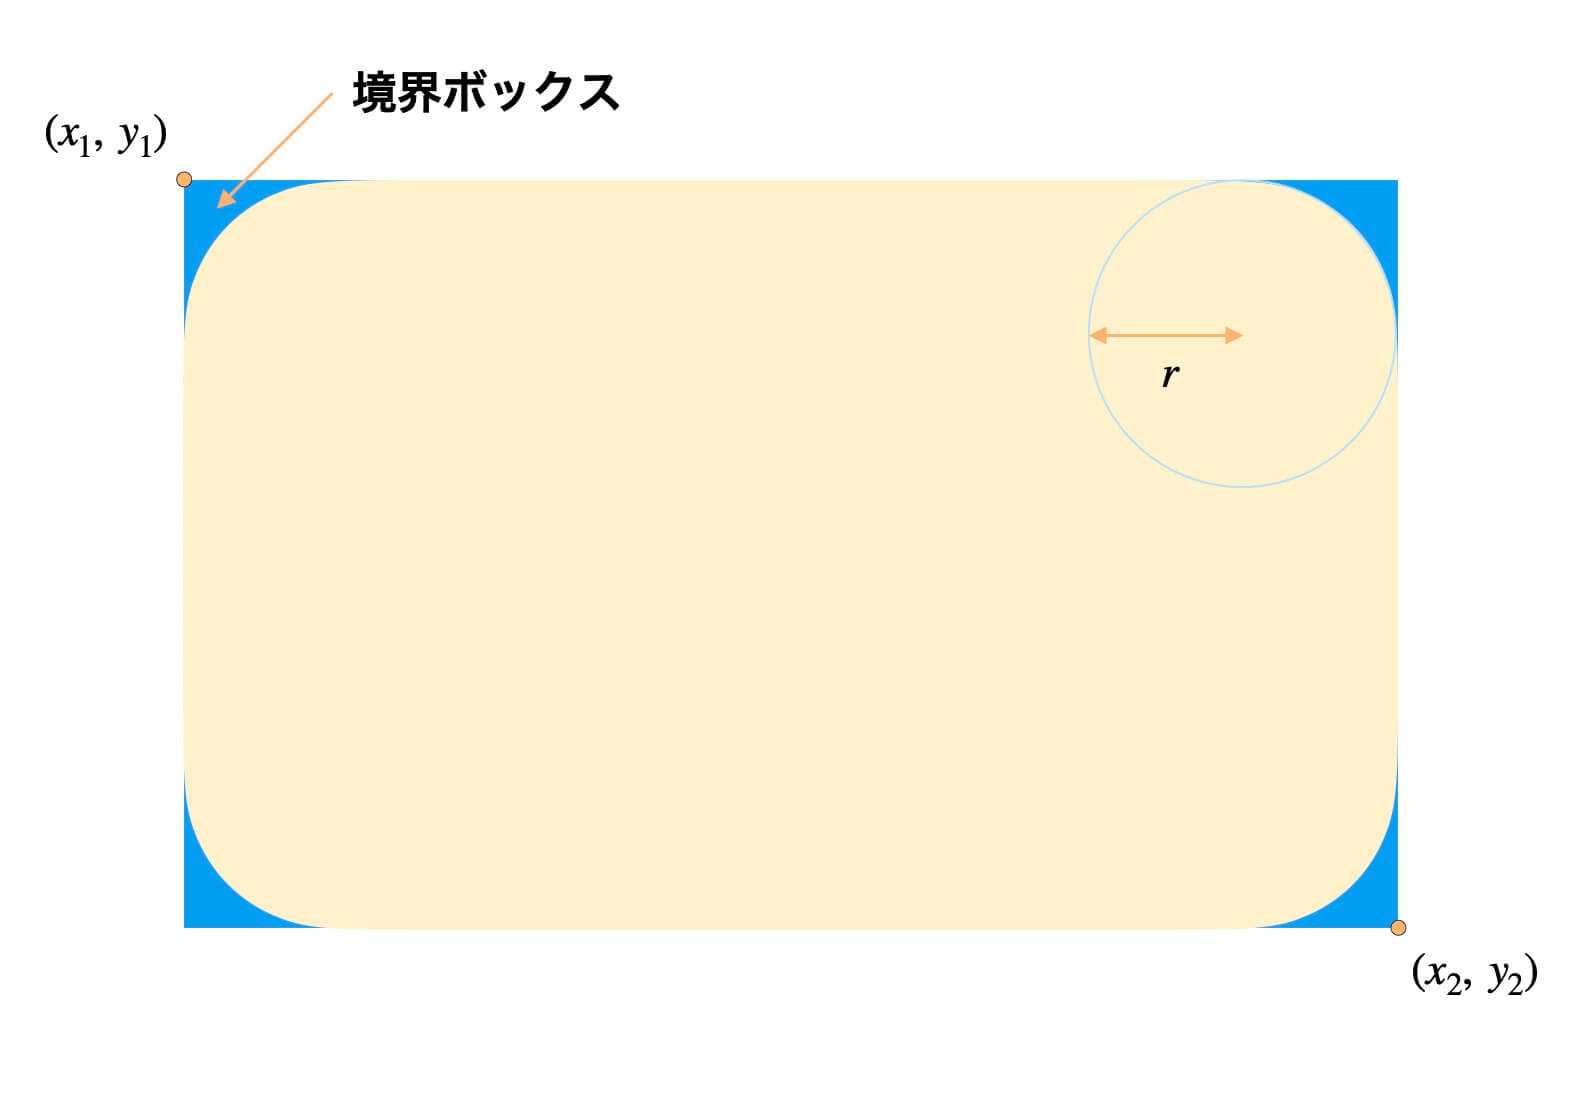
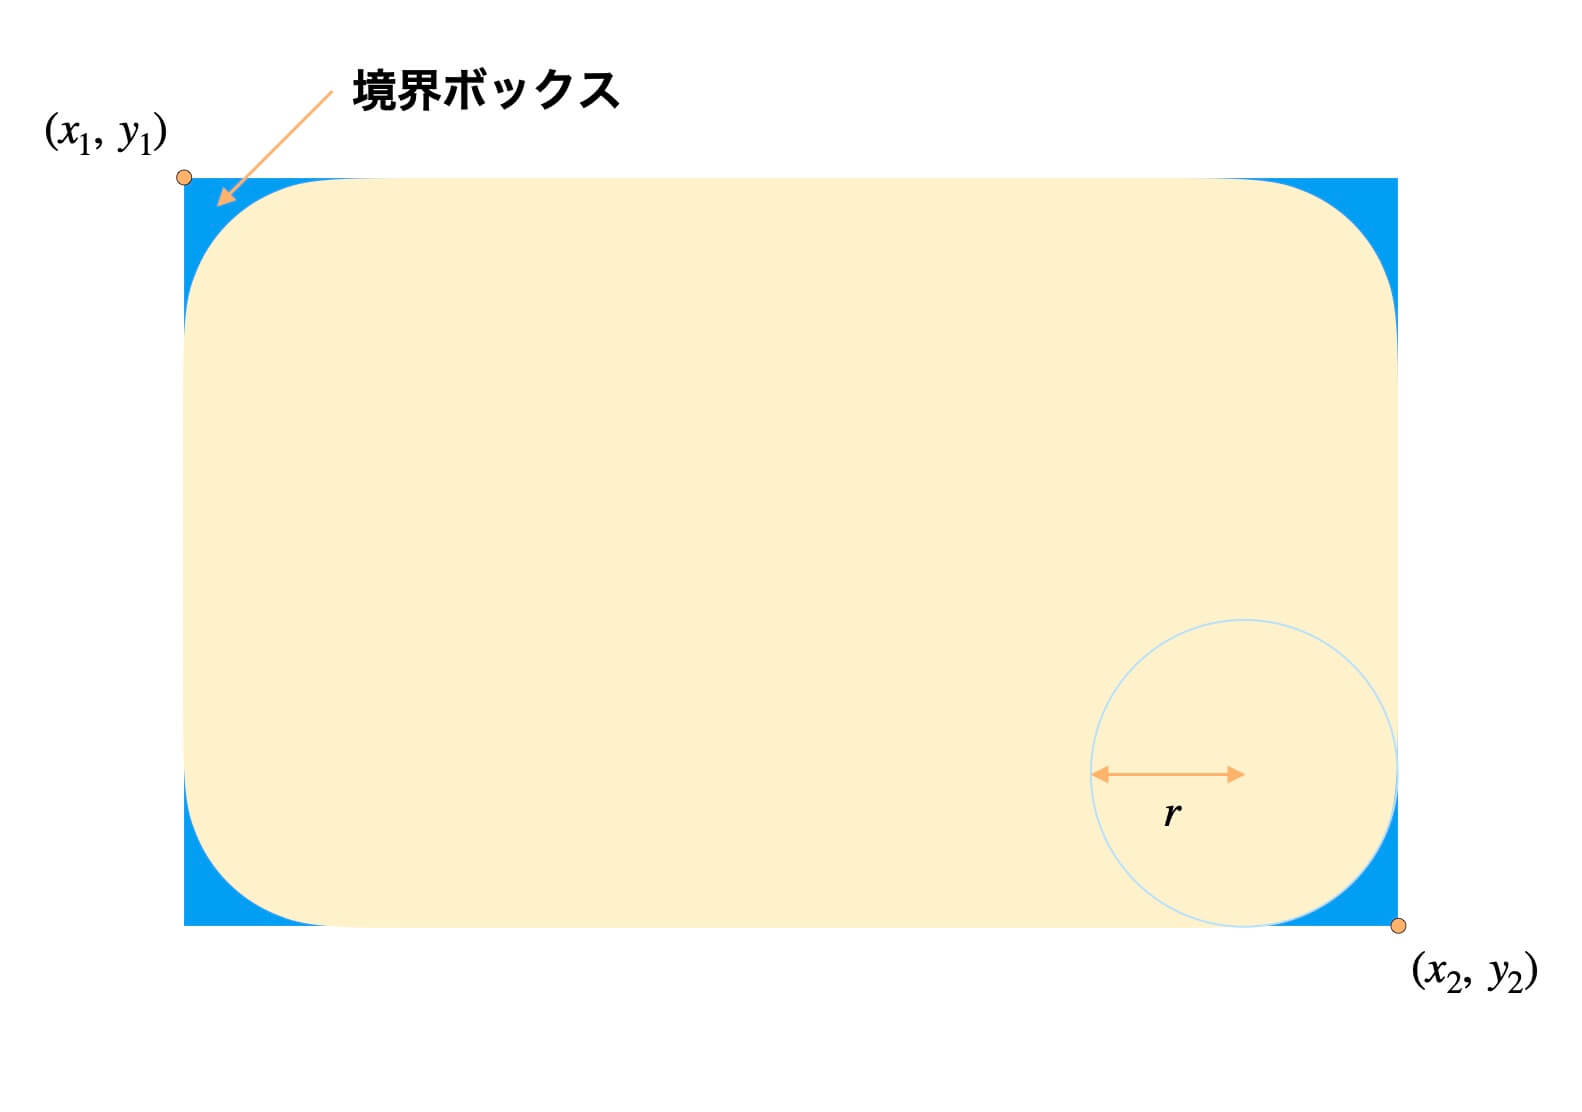
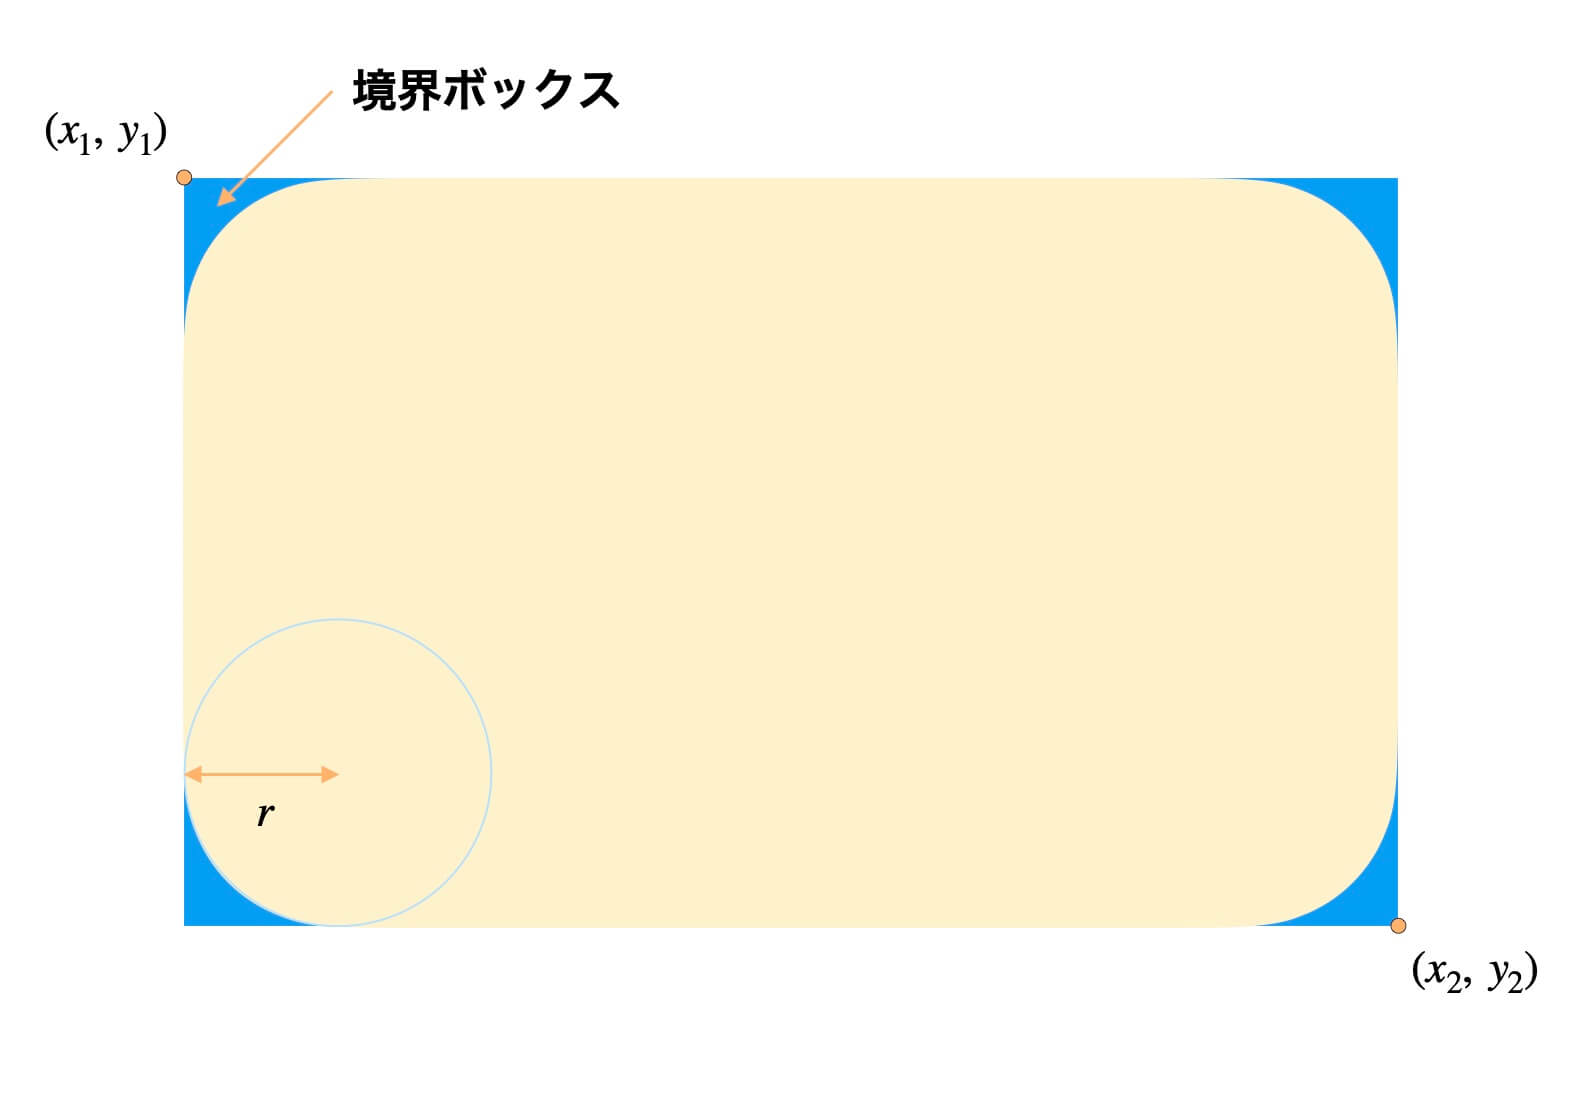
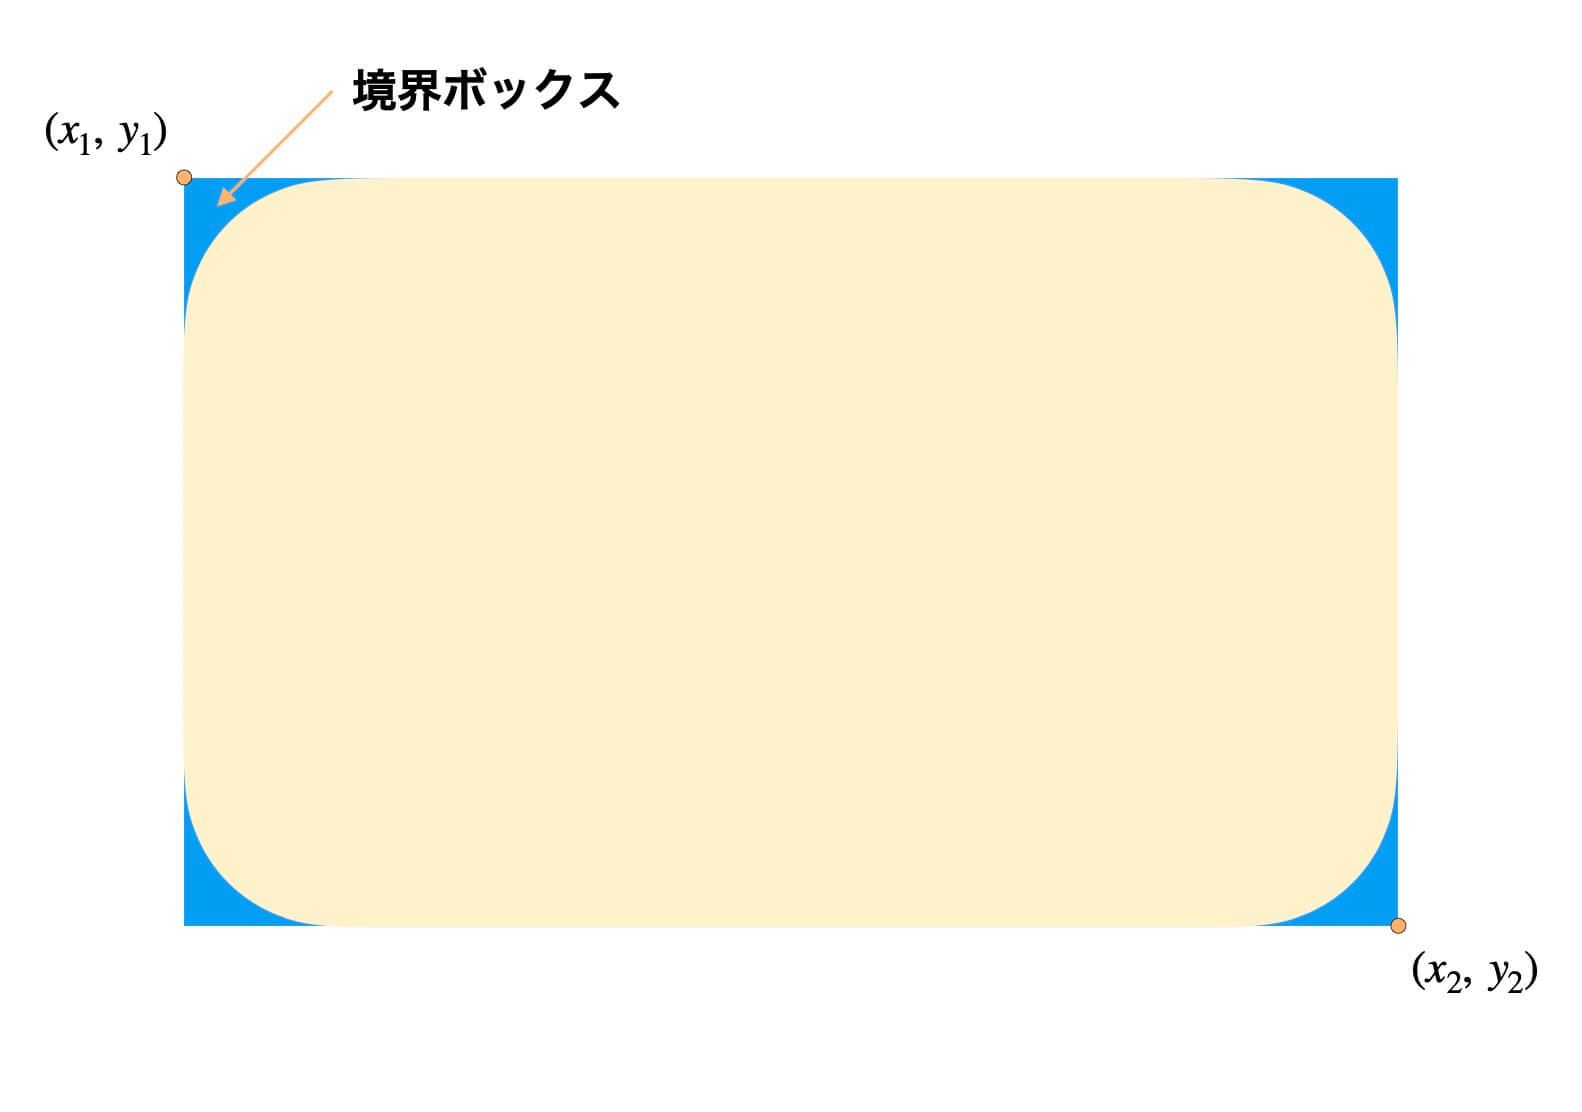
bbox_coords: 境界ボックスの座標のリストradius: 左上の丸みの半径
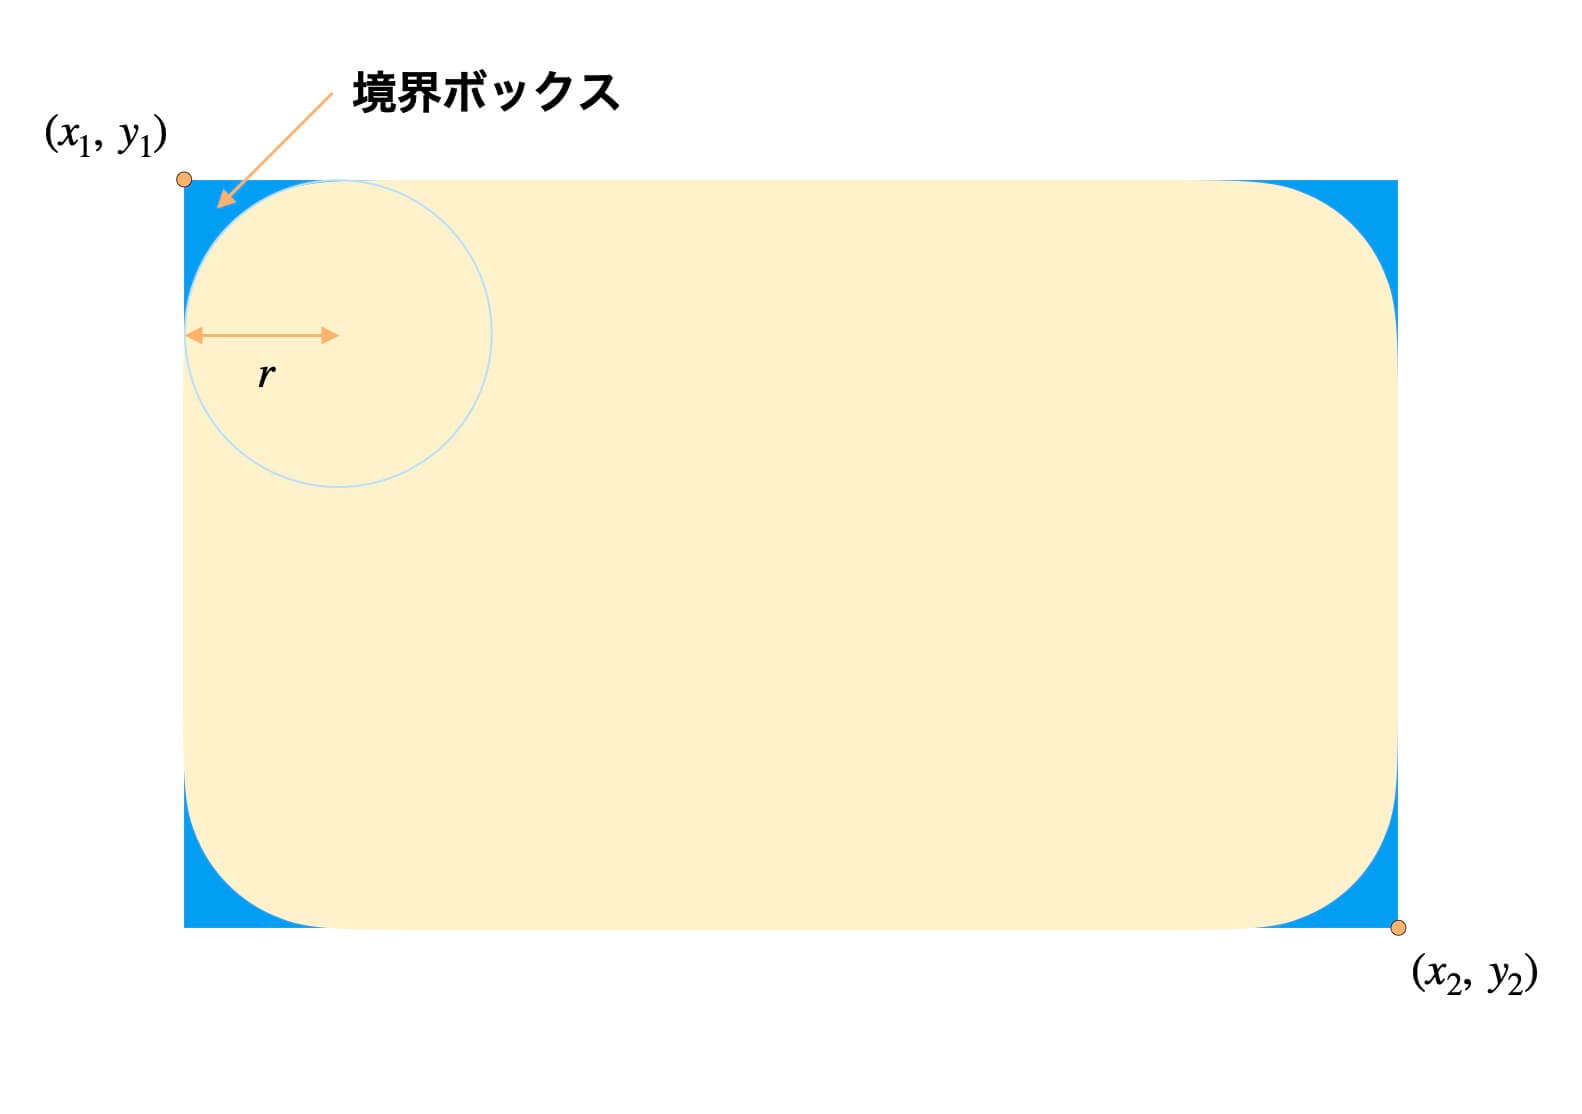
bbox_coordsは境界ボックスの左上と右下の座標が入っています。
print(bbox_coords)
# [x1, y1, x2, y2]

print(
    bbox_coords[0],
    bbox_coords[1],
    bbox_coords[2],
    bbox_coords[3],
)
# x1, y1, x2, y2
関数内で行なっている処理は次の\(4\)つです。
順に解説します。
まずは円の中心座標を求めます。
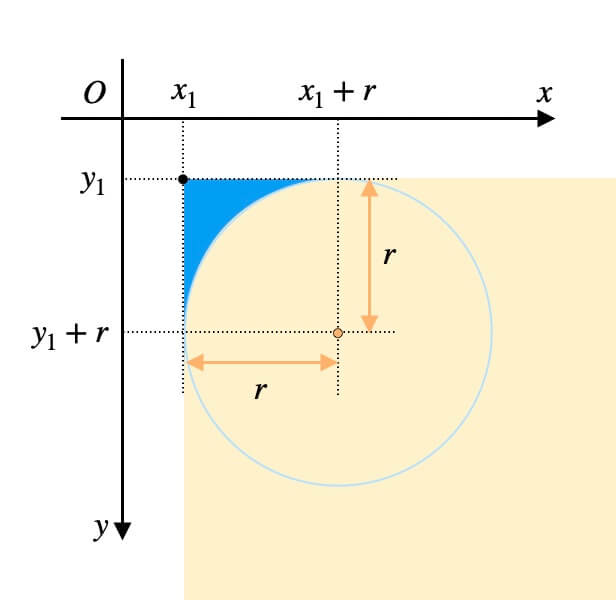
center = (bbox_coords[0] + radius, bbox_coords[1] + radius)
次に円のサイズを求めます。

    diameter = radius * 2
    size = (diameter, diameter)
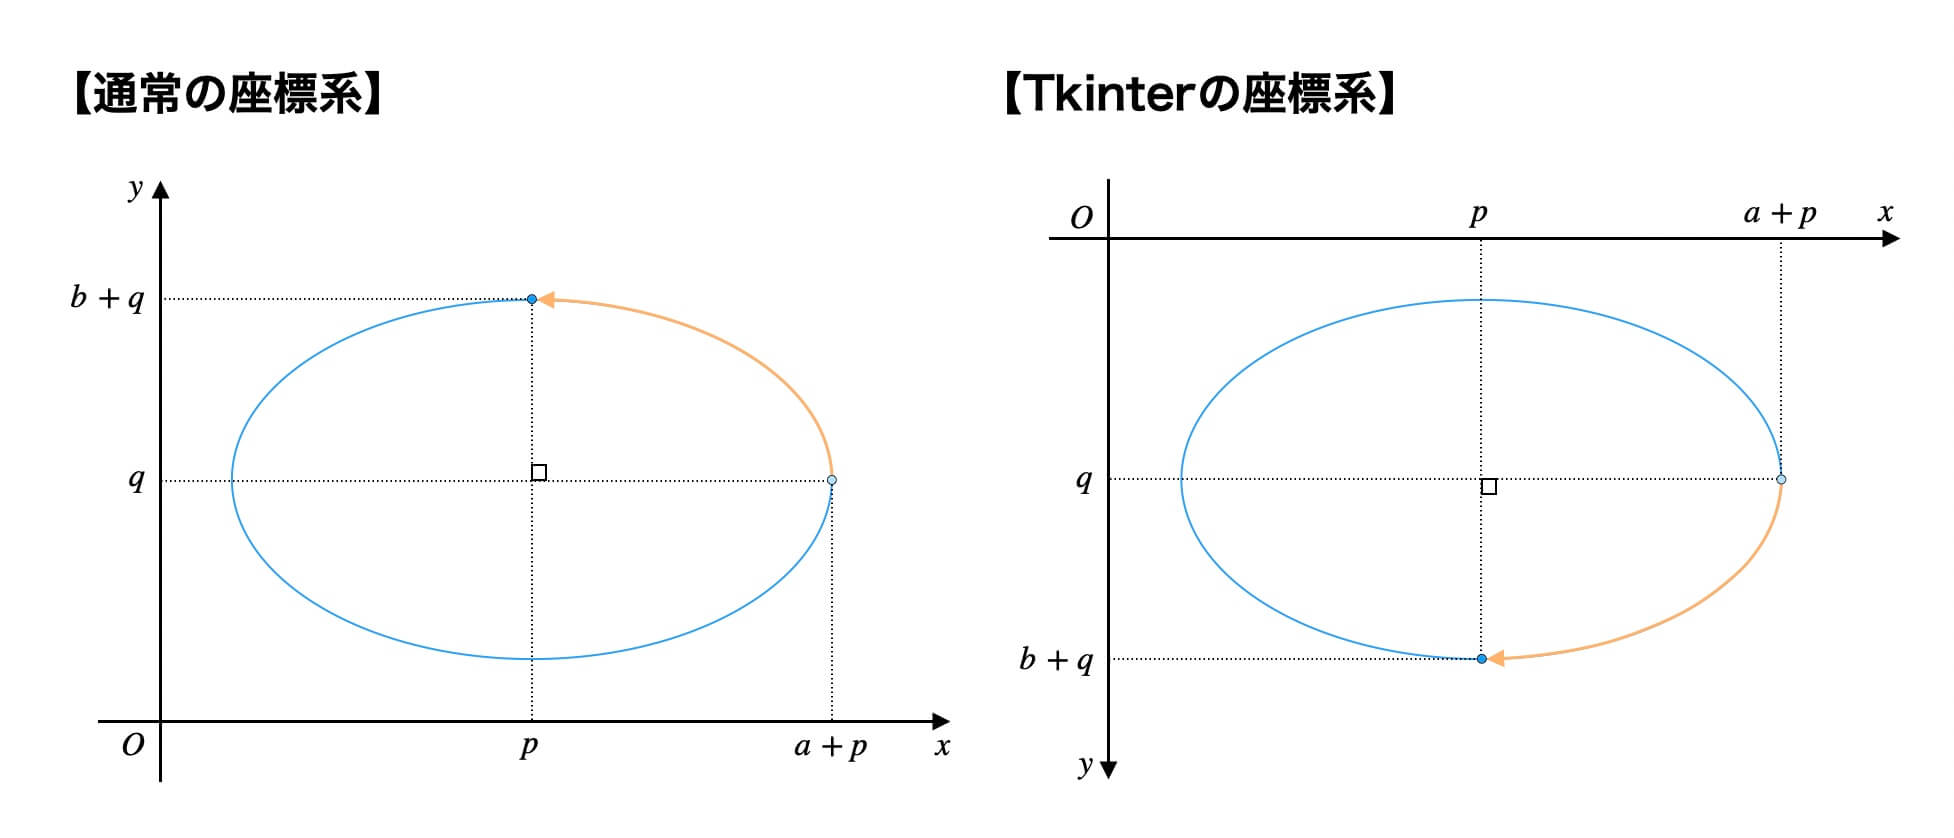
そして円弧の範囲の角度を指定します。
Tkinterの座標系は上下が反転していることにご注意ください。
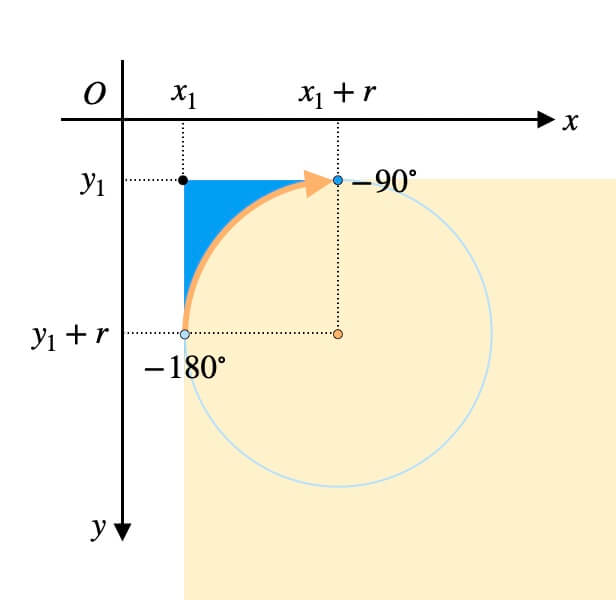
angle_range = (-180, -90)
最後にget_arc_coords関数に引数を渡して終了です。
return get_arc_coords(center, size, angle_range)右上カーブ
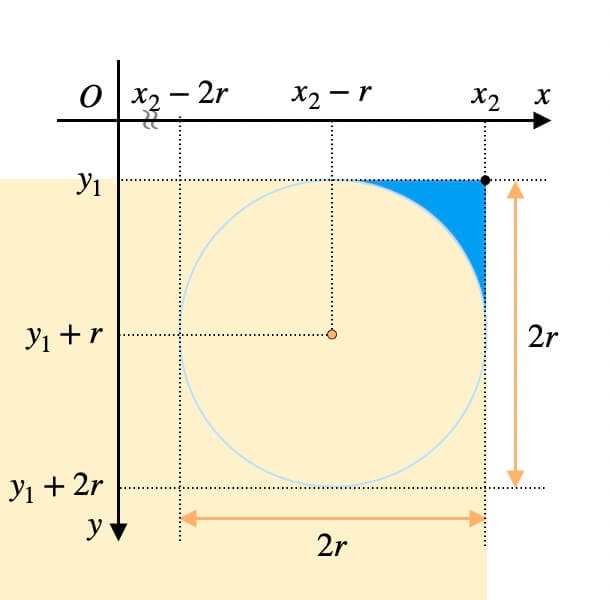
角丸長方形の右上カーブの座標を求める関数を、次のように実装しました。
def get_upper_right_rounded_corner_coords(bbox_coords, radius):
    center = (bbox_coords[2] - radius, bbox_coords[1] + radius)

    diameter = radius * 2
    size = (diameter, diameter)

    angle_range = (-90, 0)

    return get_arc_coords(center, size, angle_range)
引数は\(2\)つです。
bbox_coords: 境界ボックスの座標のリストradius: 右上の丸みの半径
bbox_coordsは境界ボックスの左上と右下の座標が入っています。
print(bbox_coords)
# [x1, y1, x2, y2]

print(
    bbox_coords[0],
    bbox_coords[1],
    bbox_coords[2],
    bbox_coords[3],
)
# x1, y1, x2, y2
関数内で行なっている処理は次の\(4\)つです。
順に解説します。
まずは円の中心座標を求めます。
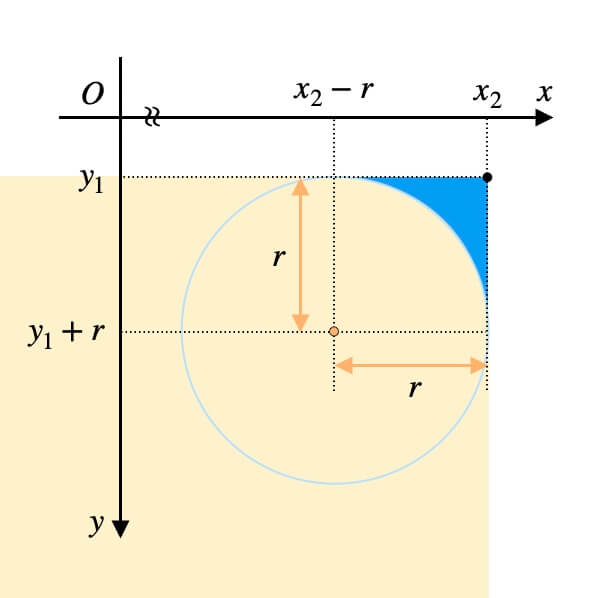
center = (bbox_coords[2] - radius, bbox_coords[1] + radius)
次に円のサイズを求めます。
    diameter = radius * 2
    size = (diameter, diameter)
そして円弧の範囲の角度を指定します。
Tkinterの座標系は上下が反転していることにご注意ください。
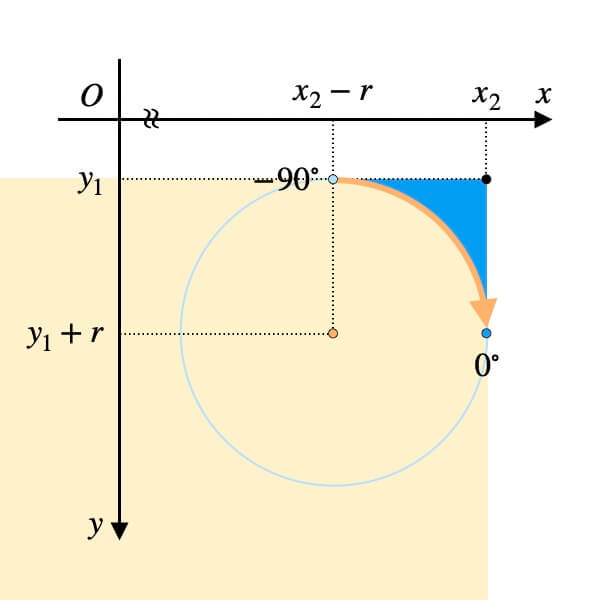
angle_range = (-90, 0)
最後にget_arc_coords関数に引数を渡して終了です。
return get_arc_coords(center, size, angle_range)右下カーブ
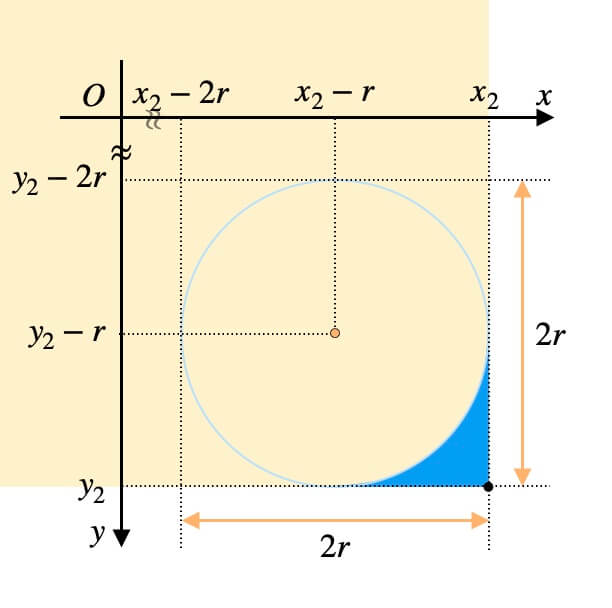
角丸長方形の右下カーブの座標を求める関数を、次のように実装しました。
def get_lower_right_rounded_corner_coords(bbox_coords, radius):
    center = (bbox_coords[2] - radius, bbox_coords[3] - radius)

    diameter = radius * 2
    size = (diameter, diameter)

    angle_range = (0, 90)

    return get_arc_coords(center, size, angle_range)
引数は\(2\)つです。
bbox_coords: 境界ボックスの座標のリストradius: 右下の丸みの半径
bbox_coordsは境界ボックスの左上と右下の座標が入っています。
print(bbox_coords)
# [x1, y1, x2, y2]

print(
    bbox_coords[0],
    bbox_coords[1],
    bbox_coords[2],
    bbox_coords[3],
)
# x1, y1, x2, y2
関数内で行なっている処理は次の\(4\)つです。
順に解説します。
まずは円の中心座標を求めます。
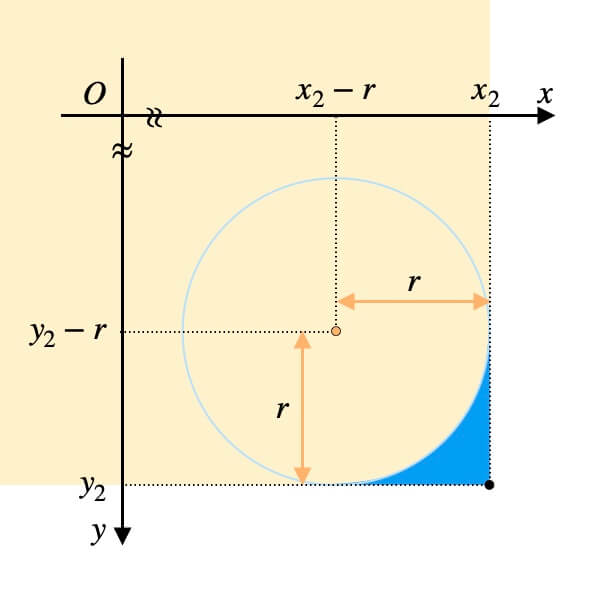
center = (bbox_coords[2] - radius, bbox_coords[3] - radius)
次に円のサイズを求めます。
    diameter = radius * 2
    size = (diameter, diameter)
そして円弧の範囲の角度を指定します。
Tkinterの座標系は上下が反転していることにご注意ください。
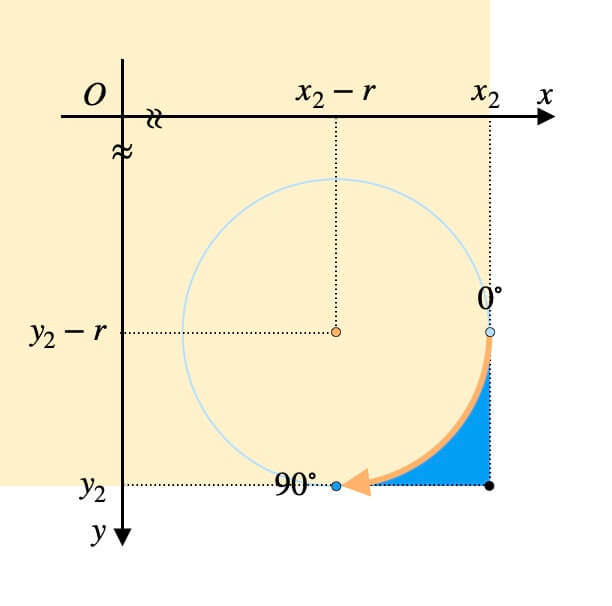
angle_range = (0, 90)
最後にget_arc_coords関数に引数を渡して終了です。
return get_arc_coords(center, size, angle_range)左下カーブ
角丸長方形の左下カーブの座標を求める関数を、次のように実装しました。
def get_lower_left_rounded_corner_coords(bbox_coords, radius):
    center = (bbox_coords[0] + radius, bbox_coords[3] - radius)

    diameter = radius * 2
    size = (diameter, diameter)

    angle_range = (90, 180)

    return get_arc_coords(center, size, angle_range)
引数は\(2\)つです。
bbox_coords: 境界ボックスの座標のリストradius: 左下の丸みの半径
bbox_coordsは境界ボックスの左上と右下の座標が入っています。
print(bbox_coords)
# [x1, y1, x2, y2]

print(
    bbox_coords[0],
    bbox_coords[1],
    bbox_coords[2],
    bbox_coords[3],
)
# x1, y1, x2, y2
関数内で行なっている処理は次の\(4\)つです。
順に解説します。
まずは円の中心座標を求めます。
center = (bbox_coords[0] + radius, bbox_coords[3] - radius)
次に円のサイズを求めます。
    diameter = radius * 2
    size = (diameter, diameter)
そして円弧の範囲の角度を指定します。
Tkinterの座標系は上下が反転していることにご注意ください。
angle_range = (90, 180)
最後にget_arc_coords関数に引数を渡して終了です。
return get_arc_coords(center, size, angle_range)角の丸みをなす円の半径
角の丸みを数値で調整できるようにします。
比率は\(0\)〜\(1\)の範囲で、\(1\)に近づくほど角が丸くなります。
角の円の半径は、半径の最大値\(×\)比率です。
すずか
先生
例えば、縦\(<\)横の場合。
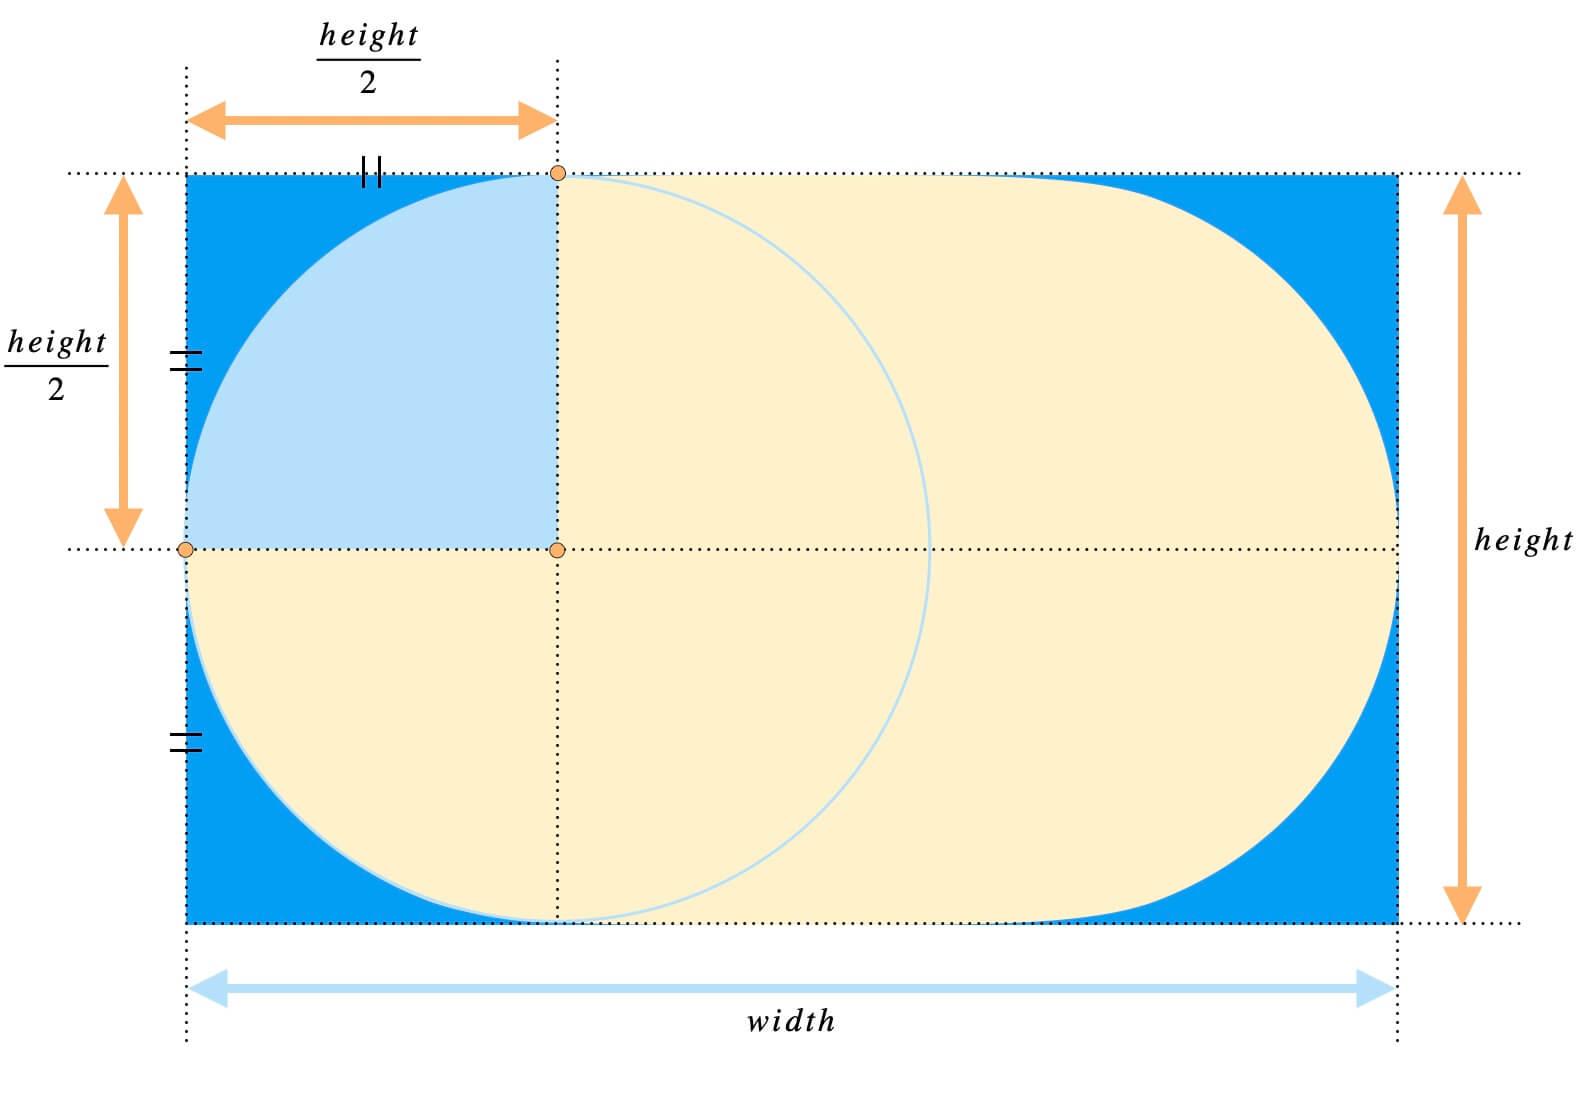
縦が短いので、縦の半分が半径の最大値です。
半径は\(0\)〜\(\frac{height}{2}\)の範囲で調整できます。
次は縦\(>\)横の場合。
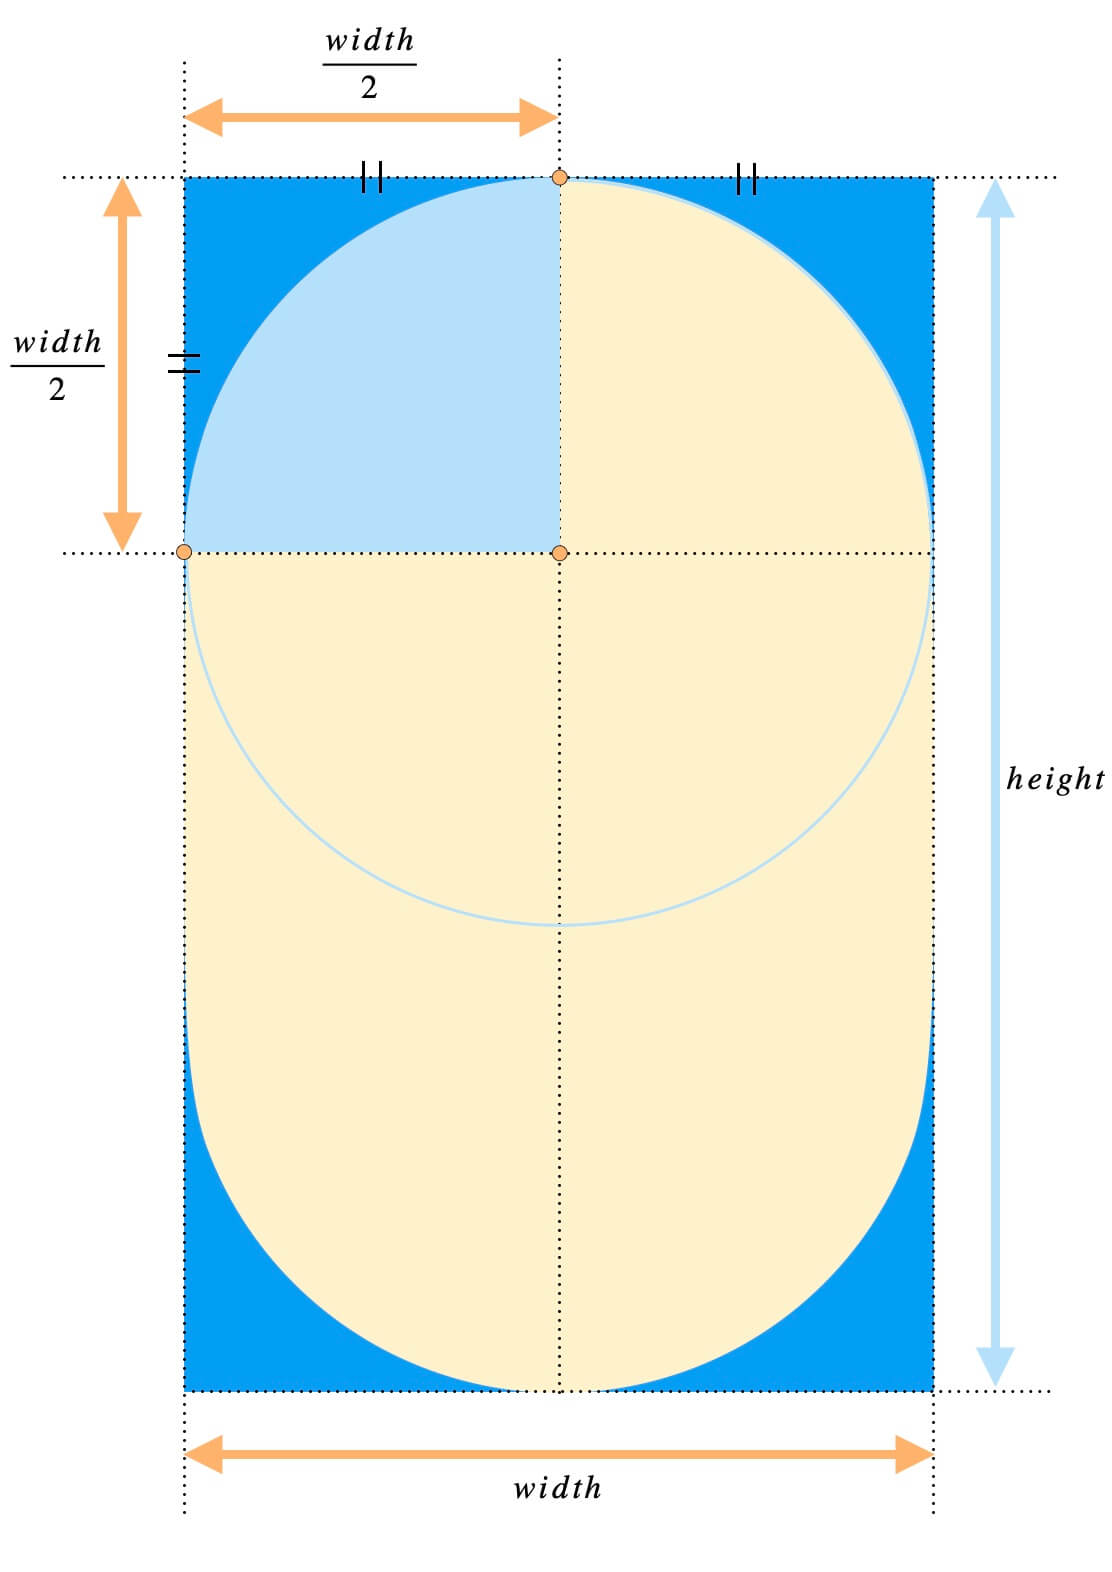
横が短いので、横の半分が半径の最大値です。
半径は\(0\)〜\(\frac{width}{2}\)の範囲で調整できます。
最後は縦\(=\)横の場合。
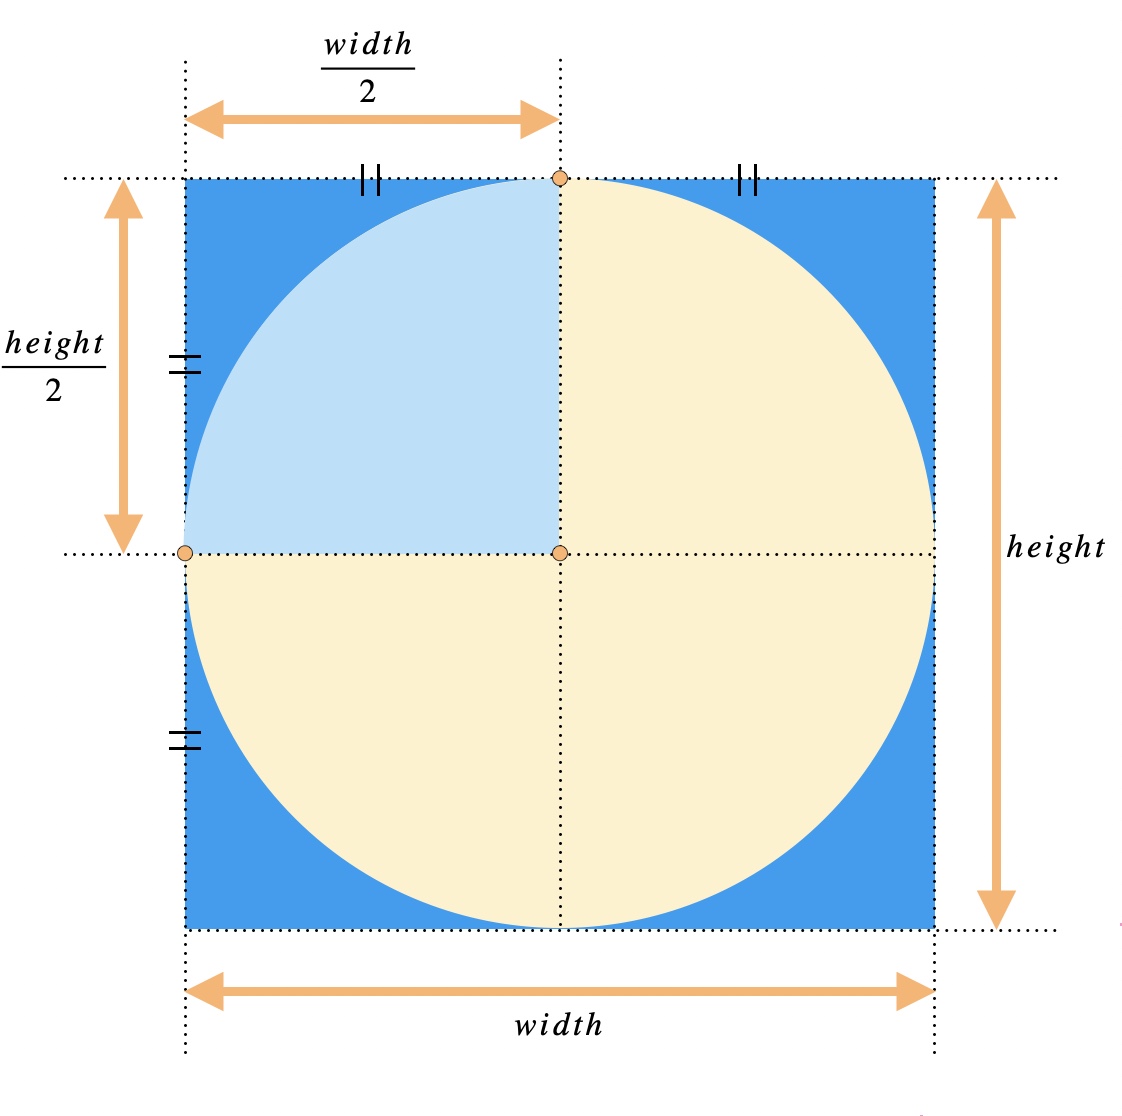
縦横の長さが同じなので、一辺の長さの半分が半径の最大値です。
半径は\(0\)〜\(\frac{width}{2}\)(\(=\frac{height}{2}\))の範囲で調整できます。
以上を踏まえて、今から\(2\)つのプログラムを作ります。
半径の最大値
角の円の半径の最大値を計算するプログラムです。
def get_max_adjustment_range(bbox_coords):
    width = abs(bbox_coords[0] - bbox_coords[2])
    height = abs(bbox_coords[1] - bbox_coords[3])

    return min(width, height) / 2
引数は境界ボックスの座標(左上・右下)です。
print(bbox_coords)
# [x1, y1, x2, y2]

print(
    bbox_coords[0],
    bbox_coords[1],
    bbox_coords[2],
    bbox_coords[3],
)
# x1, y1, x2, y2
戻り値は角の半径の最大値です。
内部では\(2\)つの処理を行っています。
順に解説します。
まずは境界ボックスの縦横の長さを求めます。
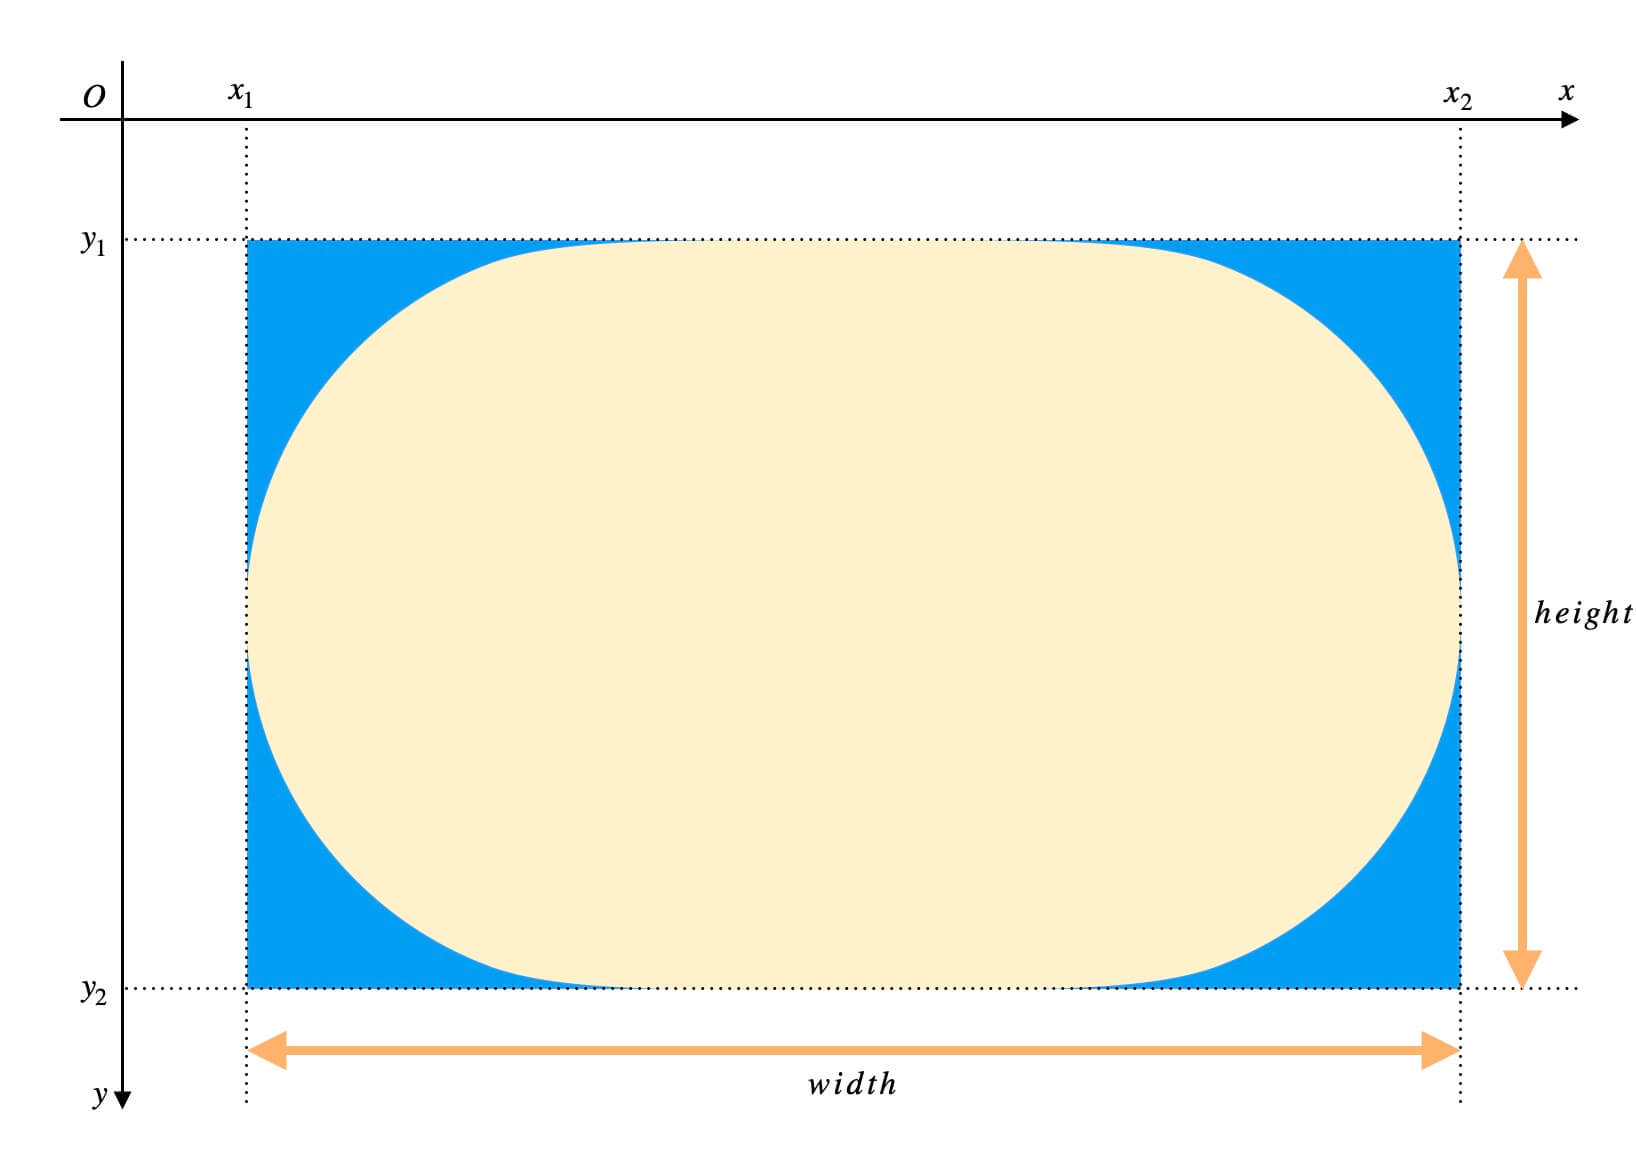
    width = abs(bbox_coords[0] - bbox_coords[2])
    height = abs(bbox_coords[1] - bbox_coords[3])
絶対値を取るのは、差が負になっては困るからです。
次に、短い方の辺の半分の長さを求めます。
min関数で縦横のどちらが短いかを特定し、
min(width, height)その辺の半分を求めて、
min(width, height) / 2計算結果を返して終了です。
return min(width, height) / 2丸みの変更
比率に応じた角の丸みを算出するプログラムです。
def get_adjustment_range(bbox_coords, ratio):
    return get_max_adjustment_range(bbox_coords) * ratio
引数は次の\(2\)つです。
bbox_coords: 境界ボックスの座標(左上・右下)radtio: 角の丸みの比率(\(0\)〜\(1\))
戻り値は比率を適用した角の半径です。
内部の処理はとても簡単。
角の半径の最大値に、比率(引数)を掛けて外に返すだけです。
return get_max_adjustment_range(bbox_coords) * ratio半径の最大値取得には、先ほどのget_max_adjustment_range関数を用いました。
完成
これまで作ったプログラムを統合しましょう。
角丸長方形の頂点の座標を求めるプログラムです。
def get_rounded_rectangle_coords(bbox_coords, ratio=1/3):
    radius = get_adjustment_range(bbox_coords, ratio)

    return flatten(
        [
            get_upper_left_rounded_corner_coords(bbox_coords, radius),
            get_upper_right_rounded_corner_coords(bbox_coords, radius),
            get_lower_right_rounded_corner_coords(bbox_coords, radius),
            get_lower_left_rounded_corner_coords(bbox_coords, radius),
        ]
    )
引数は次の\(2\)つです。
bbox_coords: 境界ボックスの座標(左上・右下)radtio: 角の丸みの比率(\(0\)〜\(1\))
戻り値は、角丸長方形の頂点の座標が入った一次元のリストです。
この関数内部では、順に次の\(3\)つの処理を行っています。
比率に合う角の半径を求める
比率を元に角の半径を求めます。
get_adjustment_range関数に、角丸長方形の境界ボックスの座標と比率を渡します。
radius = get_adjustment_range(bbox_coords, ratio)角のカーブの座標を求める
左上→右上→右下→左下の順に、角丸長方形の角丸部分の座標を取得します。
        [
            get_upper_left_rounded_corner_coords(bbox_coords, radius),
            get_upper_right_rounded_corner_coords(bbox_coords, radius),
            get_lower_right_rounded_corner_coords(bbox_coords, radius),
            get_lower_left_rounded_corner_coords(bbox_coords, radius),
        ]
すずか
先生
get_〇〇_rounded_corner_coords関数は、カーブの座標(一次元リスト)を返します。
イメージはこうです。
        [
            [x1, y1, x2, y2, ..., xn, yn],  # 左上カーブの座標
            [x1, y1, x2, y2, ..., xn, yn],  # 右上カーブの座標
            [x1, y1, x2, y2, ..., xn, yn],  # 右下カーブの座標
            [x1, y1, x2, y2, ..., xn, yn],  # 左下カーブの座標
        ]
座標を平坦化する
取得した座標を平坦化します。
           flatten(
        [
            get_upper_left_rounded_corner_coords(bbox_coords, radius),
            get_upper_right_rounded_corner_coords(bbox_coords, radius),
            get_lower_right_rounded_corner_coords(bbox_coords, radius),
            get_lower_left_rounded_corner_coords(bbox_coords, radius),
        ]
    )
平坦化とは、多次元のリストやタプル等を一次元にすることです。
a = [[1, 2], [3, 4], [5, 6]]
print(a)
# [[1, 2], [3, 4], [5, 6]]

b = flatten(a)  # 平坦化する関数
print(b)
# [1, 2, 3, 4, 5, 6]
リストやタプルを平坦化する関数は、別記事にて既に作ってあります。
>>【Python】リストの平坦化(flatten)処理を徹底解説!
コードはこちらです。
def flatten(sequence):
    result = []

    for item in sequence:
        if isinstance(item, (list, tuple, range, dict, set, frozenset)):
            result.extend(flatten(item))
        else:
            result.append(item)

    return result
平坦化した座標のリストを外に返して終了です。
    return flatten(
        [
            [x1, y1, x2, y2, ..., xn, yn],  # 左上カーブの座標
            [x1, y1, x2, y2, ..., xn, yn],  # 右上カーブの座標
            [x1, y1, x2, y2, ..., xn, yn],  # 右下カーブの座標
            [x1, y1, x2, y2, ..., xn, yn],  # 左下カーブの座標
        ]
    )
お疲れ様でした。
以上までが、冒頭のプログラムの解説です。
次章は少し遊ぶので、肩の力を抜いてくださいね。
長方形の一部を角丸にするプログラム
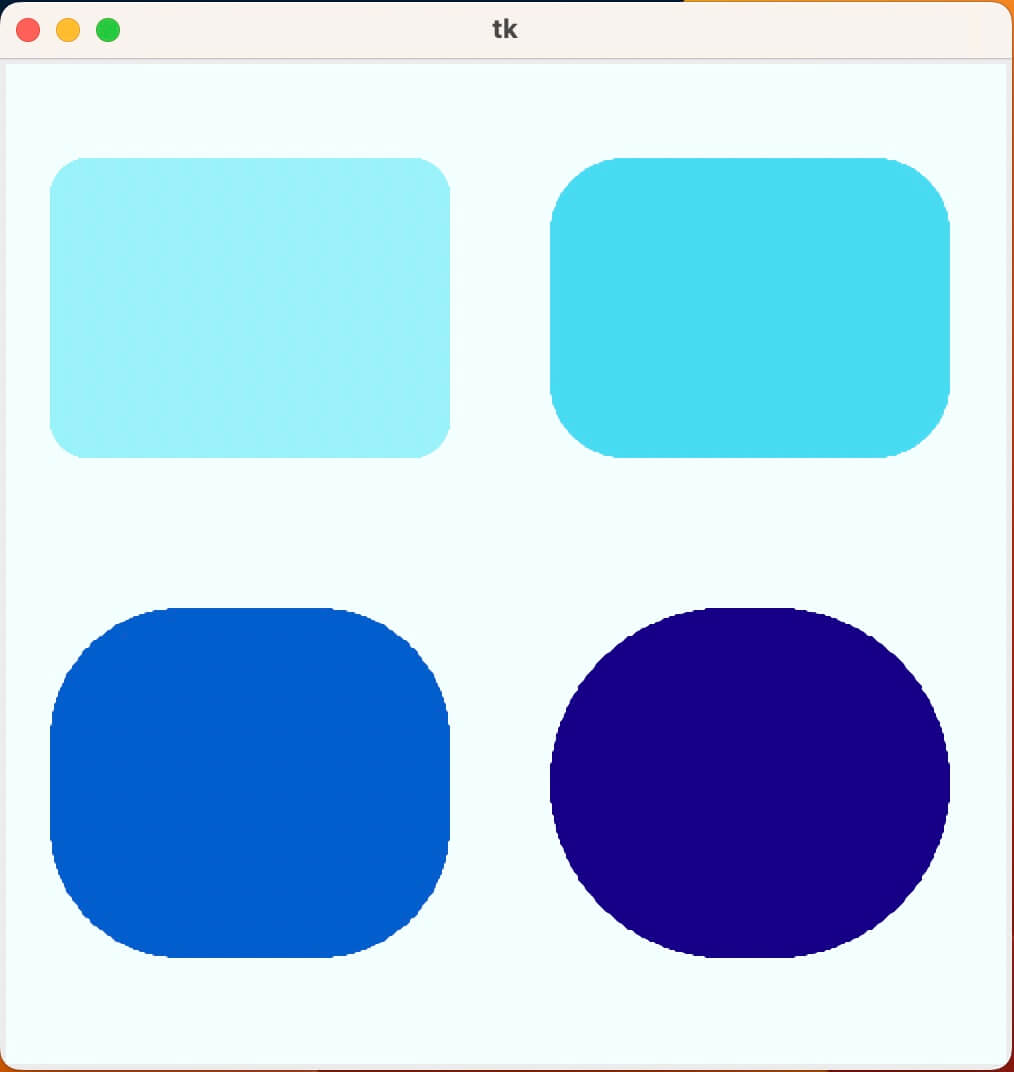
多様なニーズに応えるべく、色々なレパートリーの角丸長方形をご用意しました。
先ほどのプログラムを少し改造すれば、お好きな角を丸められます。
1つの角を丸める
長方形の右上の角だけ丸めましょう。
get_rounded_rectangle_coords関数を少し改造しました。
def get_rounded_1_rectangle_coords(bbox_coords, ratio=1/3):
    radius = get_adjustment_range(bbox_coords, ratio)

    return flatten(
        [
            get_upper_left_corner_coords(bbox_coords),
            get_upper_right_rounded_corner_coords(bbox_coords, radius),
            get_lower_right_corner_coords(bbox_coords),
            get_lower_left_corner_coords(bbox_coords),
        ]
    )
右上の関数以外を別の関数で差し替えています。
処理はとても簡単です。
# 丸めない角の座標を返す
def get_upper_left_corner_coords(bbox_coords):
    return [bbox_coords[0], bbox_coords[1]]

def get_lower_right_corner_coords(bbox_coords):
    return [bbox_coords[2], bbox_coords[3]]

def get_lower_left_corner_coords(bbox_coords):
    return [bbox_coords[0], bbox_coords[3]]

# 一応作りましたが、今回は使いません。
def get_upper_right_corner_coords(bbox_coords):
    return [bbox_coords[2], bbox_coords[1]]
境界ボックスの対角の座標から、各角の座標を返すだけですね。
以下を実行すると、先程の画像の角丸長方形が描けます。
if __name__ == '__main__':
    import tkinter as tk

    # 画面作成
    root = tk.Tk()

    # キャンバス作成・配置
    canvas = tk.Canvas(root, width=500, height=500)
    canvas.pack()

    # 角丸長方形作成
    shape_coords = get_rounded_1_rectangle_coords((50, 100, 450, 400), ratio=0.5)
    canvas.create_polygon(shape_coords)

    # 画面表示
    root.mainloop()
上下の角で丸みを変える
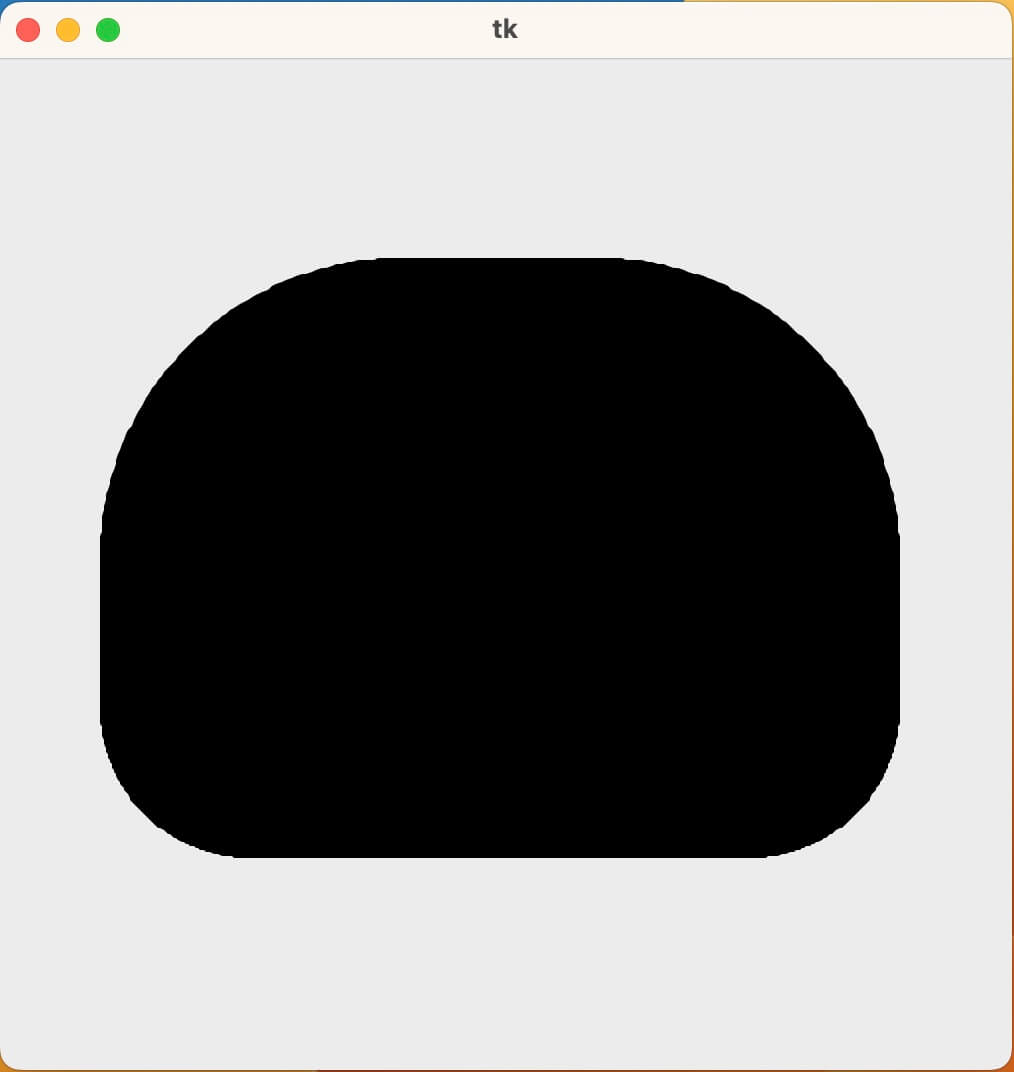
長方形の上下の角をそれぞれ同じ比率で丸めましょう。
get_rounded_rectangle_coords関数を少し改造しました。
def get_rounded_2_same_rectangle_coords(bbox_coords, ratio1=1/3, ratio2=0):
    radius1 = get_adjustment_range(bbox_coords, ratio1)
    radius2 = get_adjustment_range(bbox_coords, ratio2)

    return flatten(
        [
            get_upper_left_rounded_corner_coords(bbox_coords, radius1),
            get_upper_right_rounded_corner_coords(bbox_coords, radius1),
            get_lower_right_rounded_corner_coords(bbox_coords, radius2),
            get_lower_left_rounded_corner_coords(bbox_coords, radius2),
        ]
    )
すずか
先生
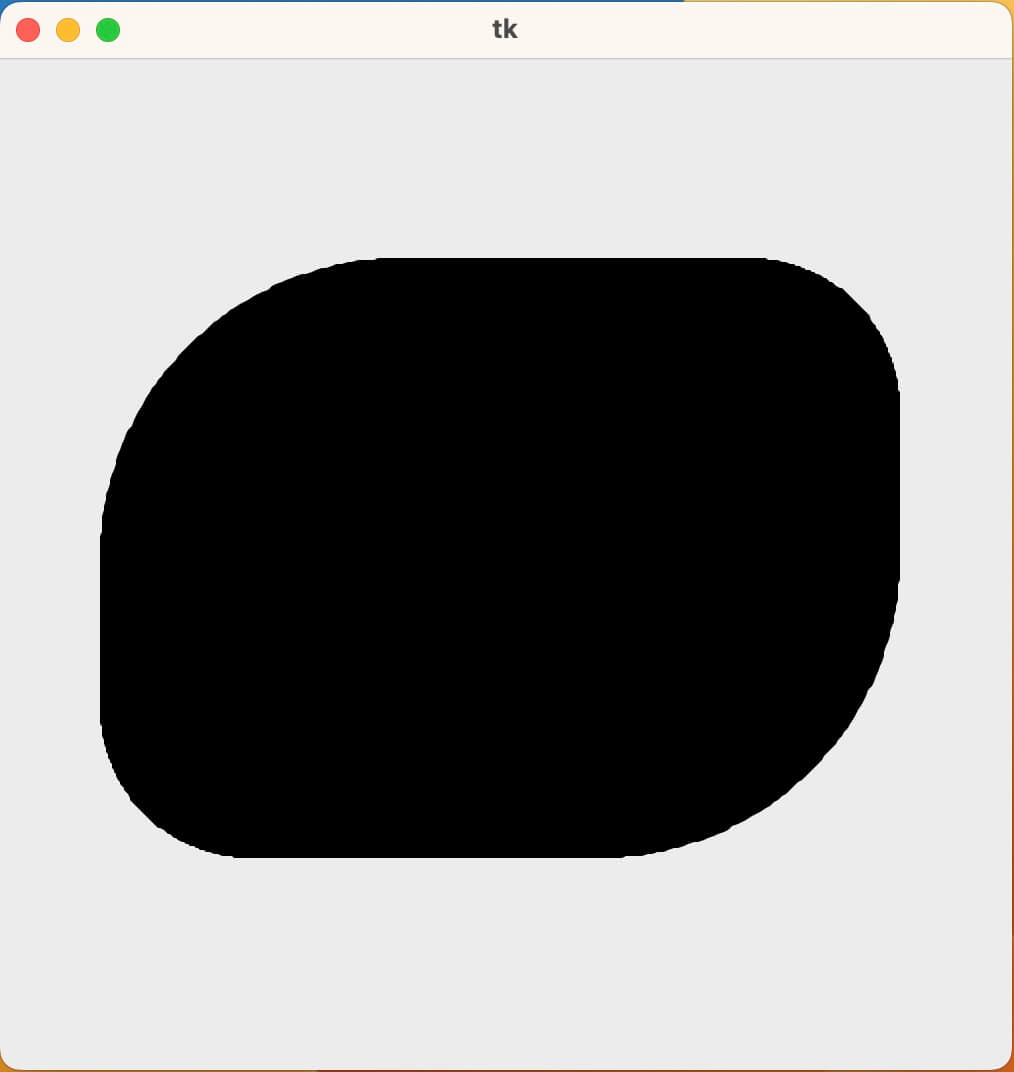
以下を実行すると、先程の画像の角丸長方形が描けます。
if __name__ == '__main__':
    import tkinter as tk

    # 画面作成
    root = tk.Tk()

    # キャンバス作成・配置
    canvas = tk.Canvas(root, width=500, height=500)
    canvas.pack()

    # 角丸長方形作成
    shape_coords = get_rounded_2_same_rectangle_coords((50, 100, 450, 400), ratio1=1, ratio2=0.5)
    canvas.create_polygon(shape_coords)

    # 画面表示
    root.mainloop()
対角を丸める
長方形の対角同士をそれぞれ同じ比率で丸めましょう。
get_rounded_2_same_rectangle_coords関数を少し改造しました。
def get_rounded_2_diag_rectangle_coords(bbox_coords, ratio1=1/3, ratio2=0):
    radius1 = get_adjustment_range(bbox_coords, ratio1)
    radius2 = get_adjustment_range(bbox_coords, ratio2)

    return flatten(
        [
            get_upper_left_rounded_corner_coords(bbox_coords, radius1),
            get_upper_right_rounded_corner_coords(bbox_coords, radius2),
            get_lower_right_rounded_corner_coords(bbox_coords, radius1),
            get_lower_left_rounded_corner_coords(bbox_coords, radius2),
        ]
    )
先生
以下を実行すると、先程の画像の角丸長方形が描けます。
if __name__ == '__main__':
    import tkinter as tk

    # 画面作成
    root = tk.Tk()

    # キャンバス作成・配置
    canvas = tk.Canvas(root, width=500, height=500)
    canvas.pack()

    # 角丸長方形作成
    shape_coords = get_rounded_2_diag_rectangle_coords((50, 100, 450, 400), ratio1=1, ratio2=0.5)
    canvas.create_polygon(shape_coords)

    # 画面表示
    root.mainloop()
いかがでしたでしょうか?
好みに合わせてカスタマイズしてくださいね。
角丸長方形の応用例
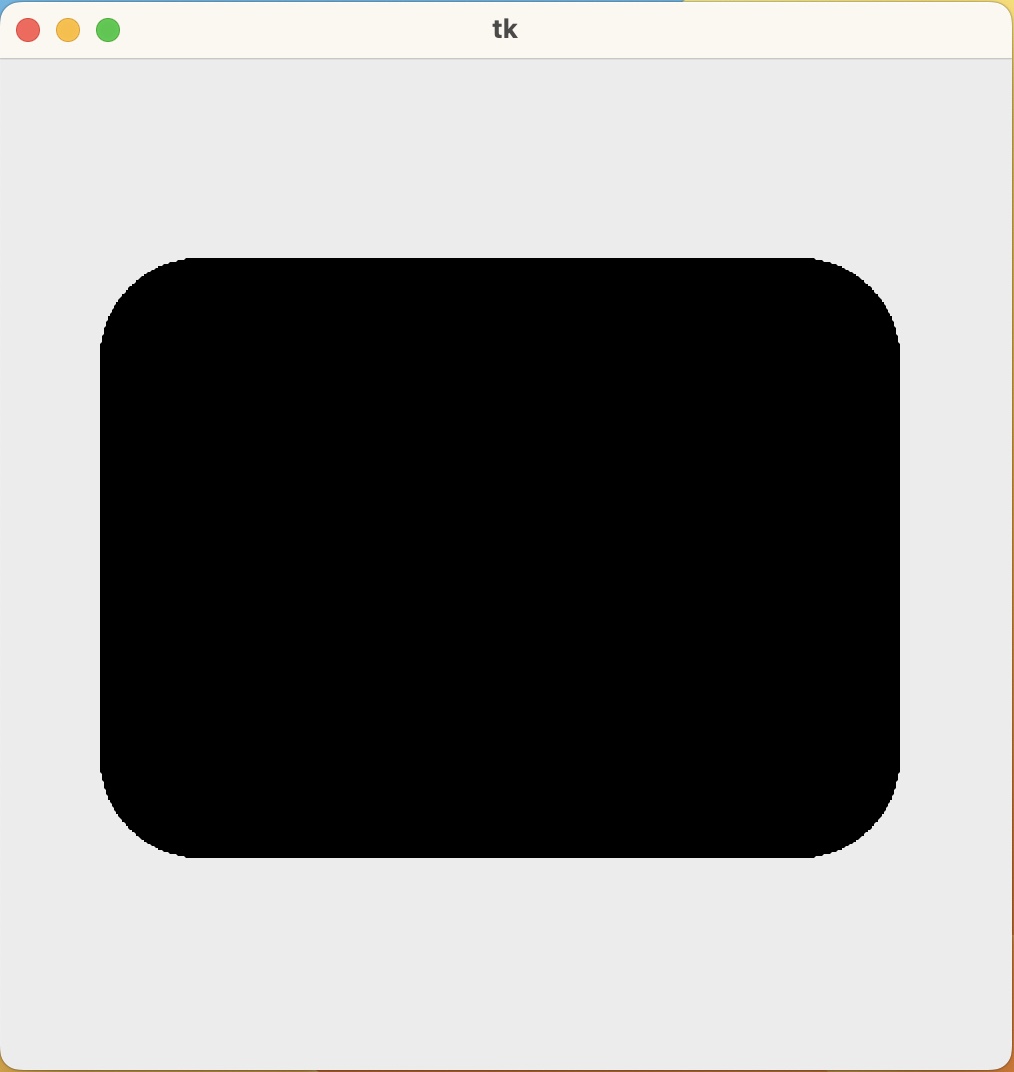
1つの角を切り取り1つの角を丸める

角を丸めて切り取りを行いました。
角丸と角の切り取りを合わせると、作れる図形の幅はグッと広がります。
長方形の角の切り取りに関しては、後日記事を出します。
調整ハンドルで角の丸みを変更する
角の丸みをマウスのドラッグで動的に調整できます。
ExcelやPowerPointではなく、Tkinterでの実装です。
わざわざコードを書き換えなくとも、ハンドルを動かせば調整できるのです。
本記事の内容を踏まえれば、意外と簡単に作れますよ。
この動きの実装方法に関しては、後日記事を出します。
まとめ
今回はTkinterで角丸長方形を作る方法についてお伝えしました。
実装方法は、大きく\(2\)つの段階に分けられましたね。
- 図形の頂点の座標を計算する。
- create_polygonメソッドに座標を渡す。
また、その中でもステップ\(1\)が特に重要で、次の\(2\)つを考える必要がありました。
四角形の角を丸くすると柔らかい印象を与えられますが、Tkinterでは直接的に角丸長方形を作れません。
しかし本記事の内容を踏まえれば、Tkinterでのデザインの引き出しが大幅にUPします。
本記事が皆様のお役に立てば幸いです。
最後までお付き合いいただき、ありがとうございました。